Monday, May 29, 2017

Looking More like a Boat! Bow fillets, Seat Back Supports and Upper Side Panels!


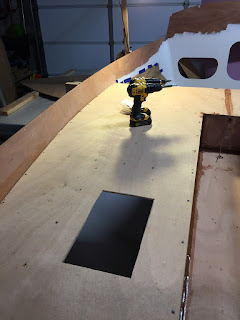
I epoxied the bow board decking last week, but then the manual calls for fillets underneath. With the larger hole on the starboard side of bulkhead #2, you can reach underneath and access the area, but it is not easy. On the port side of the boat, there is a smaller hole to access the area. Since I am planning on having an electrical panel, I went ahead and did some quick measurements and cut the hole. This allow me better access to the area. The fillets look so so, but they will do the job and no one will see them.

Picture showing the cutout for the electrical panel and for better access. 


I started to fit the rear cabin wall and got the angle from the plans. I also wanted to get the actual seat back panels and use them to make sure everything is lining up correct.  Below is the rear cabin wall stitched in.


I decided to put a coat or 2 of epoxy on the seat back frames before I installed them. I used a clothes hanger I cut and used the stitching holes to hang them.


Below is the seat back frames glued in place with a hot glue gun. I am glad that I use that glue instead of epoxy, because where I put them they are too high. They need to be move more towards the bow, so they will be flush in height with the upper side panels. The glue holds them just enough and were easy to break away. I will re-glue them this weekend. 


I had already glued the upper side panels and fiberglassed them last year, but I didn't sand them since I wanted to move on to something else and really didn't have the work room then. So, I had to use a plane to get the sharp edges of fiber glass off and then sand the fiberglass side to a grey color.  I then stitched them to both sides. I still have some adjustments I need to do before I start to tack welds. 

Starboard Upper side panel. 

Overhead view. 

Bow view of the upper side panels. They lined up very good.


Wednesday, May 24, 2017

Moving along! Bow drain plug, inspection port and floatation!

I was able to get a lot accomplished this past week. I finished up gluing the decking down on the port side of the boat. Below is the port side decking glued down and temporary screws to hold in place. I marked the underside earlier and drilled pilot holes so I would know where to drill. Once I glued the piece in place, I drilled additional holes in the stringers, so they would not split. I will say it took a lot of thickened epoxy. I used a pastry bag that I normally use for fillets to apply the epoxy evenly. I use red plastic drink cups and before I started to thicken it, I had about 1/2 cup or maybe a little more.


Both decking boards installed and I think screws removed. 

Below is the decking with the temporary screw holes filled with thickened epoxy with wood floor. In the above I usually use thickened epoxy with cabosil for wood to wood joints. I will be sanding them smooth this weekend.


In bulkhead #1 there is a drain opening that you need to install a drain plug. I wanted something that looked nice, so I purchased this Perko drain plug. No sure why some of the hardware pieces do not come with the hardware kit from CLC. I got this at Jamestown Distribution.


Close up of the drain plug. I used 3M 5200 to install as well as 1/2 inch bronze screws. 

Here is a picture of it installed. The tape on the plug was so they 3M 5200 wouldn't get on the threads. 

For the inspection hole, I installed a SeaDog plastic inspection port that I got from CLCBoats.
They fit perfectly and they are the exact depth of the wood. I took some pictures of the parts in case someone wants to order the same thing.


The next set of pictures are the floatation in the bow section. You are supposed to create a tunnel for installing the bow-eye later on. I cut out using a pattern for the 2 larger pieces, but had a problem trying to keep them in place. I thought about using a hot glue gun, but then thought about the trusty ole cable tie. You can see a piece held together below on the top. Right below the inspection port, there is another piece, so I have both the top and bottom forced apart. I was then able to cut smaller pieces and wedge them in firmly. 


This is a good view of the tunnel I created. I will fill this in later with smaller pieces put through the inspection port.


Below is the smaller pieces wedged in on both sides. I measured the widest part and then cut by eye until I got it to wedge in firmly. I put a couple extra pieces on top, so they should not move much or if any.


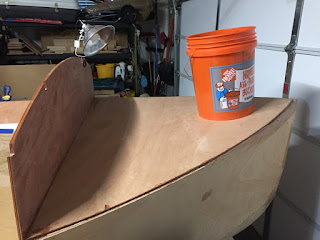
Below is the decking over the bow section. It is all closed up now!  The bucket is filled with clamps. I used it as weight to hold down the bow decking until I could put some temporary screws in. I have removed them and need to fill and then sand smooth.  The piece fit pretty good. I did have to use a plane to allow a edge for the upper piece that I will be installing this weekend.  You can see the edge below if you look closely. I was sure to clean up any thickened epoxy. 


Another picture of the decking in place. I will have to climb inside this weekend and put some fillets along the sides. Not looking forward to that!


Below are the cabin wall and bow decking that I put 3 coats of epoxy on the inside / underside before installing them. 


Things are moving along pretty good. I hope to get a lot more done this coming up weekend. 

Sunday, May 14, 2017

Centerboard Sheave, Inspection Plates, Foam Flotation and Starboard Deck glued down!

I made a lot of progress this past week with the boat. Below is a picture of the top of the centerboard sheave. I have a large 3/8 inch stainless steel bolt and acorn nut on one end holding the sheave in place. The sheave and the bolt came with the hardware kit I bought from CLCBoats. I used the 3m 5200 marine sealant on both sides of the bolt and nut. I had to play with it a little as to not bind the sheave from spinning, but after a couple of times I was able to get it.  If you look closely, you will see tape on the top of the centerboard trunk. The manual instructed you to tape and cut as closely as possible on each side to leave as much glueing surface as possible. This is right before I glued one of of the decking boards down. The tape is to prevent any epoxy from dripping down.


The 3M 5200 marine sealant works very good and I plan to get more of it for various tasks on the boat. The sealant hardens after 24 hours and locked the nut and bolt into place with the sheave. I used the sealant on the inspection plates as well and used 1/2 inch bronze screws to hold it in place. I had to be very careful with the depth in which I drilled the starter holes for the screws, so I would not go all the way through the center board. Again everything worked very good. 


Below are pictures of the inspection plates on the center board. I had to cut the top of each flat so they would fit underneath the stringer shown.  I bought the inspection plates from CLCBoats and they fit perfectly with the thickness of the side centerboards. This way they will not bind or touch the centerboard once it is installed.


There is supposed to be foam flotation under the decking in the stern of the boat. I purchased the Owens Corning foam insulation and cut it to fit under the cockpit flooring. You can see the cardboard pattern below I used to mark the pieces. I used a fine tooth saw to cut the foam. It didn't make too much of a mess.


Below you can see the pieces installed. I taped every 2 pieces together and they fit snuggly under the cockpit. I think it was a total of 7 pieces and they are wedged in between the stingers that you can't see. 


Below shows the 2 stringers going from stern to bow / from bulkhead 8 to 7. They are extra support for the decking boards.


Below is the starboard decking glued down with temporary screws. I cut out a portion of the decking where the hatch covers will go. I wanted to have access to pull the newspaper and tape I used to protect from epoxy drips. I will cut the holes to correct size when I am ready to install the hatch covers. 


Tuesday, May 9, 2017

Beaufort NC Wooden Boat Show

Not much building last week. My wife and I decided to go to the wooden boat show in Beaufort North Carolina. Well, I decided to go and was able to talk her into it. I went to the boat show and she shopped! We had a great time in one of our favorite towns. We have been vacationing there for the last few years and will be renting a place next September. There were a lot of nice boats to look at, but only one pocket cruiser like PocketShip. It was a Core Sound 17 Mark 3 by B&B Yacht Designs.  I was able to chat with the designer/owner Graham Byrnes a little bit and didn't realize who he was until I visited his website.  He was just taking out after a overnight cruise after the Boat Show. You can check out his designs at http://bandbyachtdesigns.com/.


The best in show went to a wooden Viking ship. Very nice detailed work. Check out the picture below. It was a lapstrake construction. The builder also incorporated a trolling motor in the rudder, but the coolest thing is the fire coming from the dragon's mouth. That was real !!!


I will be at home this week / weekend and plan to get some work done on the boat instead of playing!

Monday, May 1, 2017

Cockpit sides and bottom done!

I have completed right much in the last week or so. I finished applying fiberglass and 3 coats of epoxy to the deck boats. You can definitely tell the difference in the strength of the boards. They give less. If you look closely, you can see the pencil marks where I need to drill holes to hold the deck boards down temporarily when epoxying.  The manual doesn't say anything about sanding these, but if I am going to paint them at a later date, they will need to be sanded. I have also seen other builders painting them prior to installing them. I will have to consider that as well.


I also completed epoxying the cockpit sides and bottom. I then did the fillets in the bottom. It's been a while since I have done any, so they turned out ok. I will need to smooth them out by sanding. I used the denatured alcohol on the glove trick, but it looks like I made them lumpy in a couple of places. Nothing major, just some additional sanding! :-(

Also notice that I covered the interior paint and floor boards with newspaper to protect them.


Cockpit sides dry fit to make sure everything lined up. 

Epoxying them up. I used some clamps to hold in place while I drilled and installed the screws. 

Notice the temporary screws I used. I predrilled them so as to not split the stringers. I removed the screws and will need to fill in the holes with thickened epoxy. The screws were 3/4 inch wood screws I had already. 

Bottom cockpit board is glued down. 


All done with fillets. 

Will need to sand the fillets in some places to smooth them out.