Monday, March 26, 2018

Vacation and New Festool!

I was on vacation all of last week, so needless to say there was no boat building being done.
We went to Charleston South Carolina for the week. While visiting one of the plantations there, I discovered a 1800's boat that was used and thought I would share.  I found it very interesting that it was actually made from 2 pieces or log half's. The boat was about 27 feet long and about 4-5 ft. wide. That had to be some tree! 


New Festool and Companion Way

When I got back I visited the local Woodcraft store in Richmond and decided to buy a Festool vac and sander. While there I talked with the store owner Ed Sontag and he helped me with the order. Very nice customer service and I recommend the place. I plan on going back to get various tools and to purchase the lumber for the boom gallows and rudder handle in a few weeks. Its like a toy store, so I need to be careful! :-)

Yesterday I got the Festool RO 90 DX out and used it to sand the companion way hood. I am very satisfied with it. The model is one of the smaller ones, but it sure does have a lot of power. When on the highest speed, you definitely need to hold on with two hands. Turning the speed down, it was easily managed. I know these things are expensive, but with the amount of sanding that I still have to do I think this will be a definite time saver. I was also happy with the lack of dust that I normally have with my regular shop vac and sander. The Midi vac is also a lot quieter, which will make the wife happy! 

Below is the companion way hood and slide. I sanded everything down and then filled all the screw holes with epoxy. Once they cure, I will sand again and then apply the fiberglass.


Not trying to sell anyone anything, but just showing you what I am using. 

RO 90 sander

Midi Vac


Monday, March 12, 2018

Companion Way and Rudder

Companion Way

After getting the angles planed, sanded and lined up for the companion way framing, I epoxied them in place. Below is the companion way hood being glued up. I used a piece of scrap board on the other end to help line things up.  I also had to go purchase some longer clamps. I got 4, which will do.  I used screws as well, but I find when screwing something together, the screws will sometimes push things out. The clamps hold them from doing that.


After the front piece cured, I epoxied the top piece of plywood on and used screws and wood blocks as to not damage the plywood.  The picture below shows this and also the trim piece, but I just have the trim piece clamped in place as to help form the top piece while it cured.


The companion way hood has been curing for about a week, so I started off this weekend by cutting the extra pieces off the edges. I used a small hand saw. If I would have thought about it ahead of time, I could have just aligned the edge of the plywood with the aft part of the hood. That would have saved me the time of marking and cutting one edge. Not a big deal, but a hint for future builders.

I started to sand the edges, but decided to wait until I fill the screw holes with thickened epoxy. That way I can do a final sanding before applying the fiberglass.


Picture of hood with edges cut off. The edge I was referencing is shown facing you. 


If you recall, I didn't have the correct size of wood in my timber kit, so I decided to use the 3/4" piece left over when I cut the front hood piece. Be sure to save these when you cut them out. They may come in handy.

Below is a picture of the trim piece epoxied on with clamps and a few screws. Instead of making the sharper edges like the manual states, I used a round over bit on my router. I think it looks just as good!


Another picture of the trim piece curing with work lights. It is still in the 50's in the garage. 
I also worked on the framing of the companion way slide. I finished up the edges with a plane and then a final sanding. The piece of plywood fit pretty good. I then epoxied the framing together with screws and then epoxied the top down with screws and a few clamps. I used the clamps in a few places that I saw the plywood not fitting properly. The clamps pulled the plywood down more for a tighter fit. 


Rudder
The manual calls for you to use a chamfering bit in your router to do the "cheek" edges on the rudder. I didn't have one, so I bought one. Below is a picture of the bit. The only problem I had was the bottom edge of the "check" that touches the plywood. If you can see the little bearing below on the top of the bit. That is used so you don't cut too far into the wood. It also hampers you from a height perspective. For that edge, I just used a small plane and cut the edges down some and then sanded. They don't have the same angle, but look fine.


Below is the finished product. I decided to work outside, since the router blows dust all over the place.

The edge I used a plane and not the router is marked with an X. 


Up Next
I will let things cure for a couple days and then start to sand on the companion way for fiberglassing.
I will also work on the bottom piece of the rudder. Getting that glued on.

Wednesday, February 28, 2018

More Companion Way Work and More Glassing


Still working on multiple things at one time.


Companion Way
Once I figured out the width issue on the front piece of the companion way, I temporarily screwed the pieces together to test a dry fit.  I then spent some time working on fitting it better to the cabin deck. I had to sand the front piece and sides to make thinks lay better. I still haven't screwed it to the decking, but will do so soon.

Below I added little blocks of wood and epoxied in place to the side companion way pieces.  I then cut off and sanded flush.


There is also a trim piece that goes on top. ( below top left)  The piece of lumber that was provided with the timber package didn't allow enough to do the angle and provide enough height. I decided to just use the left over piece from cutting the front part. I will deviate some from the manual and use a smaller piece of wood (3/4" vs. 1" ) and I plan on doing a round over on the edges. I will post some more on this once I do it. On the list of tasks todo!
Dry fitted and sides screwed in. Trim piece and plywood is just sitting on top. Trim piece needs to be formed with round-over and all glued together.


Glassing

With the weather being warmer last weekend, I was able to lay down fiberglass on some of the larger areas. 

Below is the starboard side cockpit area. I cut one large piece that wraps over into the footwell.
This took a lot of epoxy! and took about 1.5 hours to do everything.  This was fun climbing in and out of the boat.


Same piece all wetted out with first coating of epoxy.

I also added another layer of fiberglass to the bow area where the tabernacle will be going. I think this is my 3rd layer of glass in this area, since it has been a trouble spot for some.  


Below is a picture of either the 2nd or 3rd coat. I think 3rd. It was starting to get a little cold, so I decided to use the work lights. I think the garage was around mid 50's, so the lights in this area should warm the epoxy enough to cure.


From a fiberglass standpoint, I still have the port side large piece and then the cockpit foot area. The a whole lot of sanding!! 

I will keep plugging at it one task at a time! I wish it would hurry up and get warm. Epoxy and cold do not mix very well. 


Sunday, February 11, 2018

Companion Way, Rudder and More Glass


Rudder

I have been working a couple of things in parallel as time and weather permitted. Below I am finishing up gluing the cheeks to the rudder. These are to provide more strength were the tiller is inserted. I finished up sanding them with my belt sander and I need to go purchase a chamfering bit for my router to clean up the edges.


As you can see, I am using work lights to help the epoxy cure. I left them on for 24 hours and then moved them into the house to cure for a week.


Companion Way

With the companionway I had some issues. Below is the smaller slide and I just used the patterns to cut them out.  This part was pretty easy and no issues. I used some bronze screws to screw the ends together. I used a counter sink and will need to plug them when I epoxy them up. 


Below is where i screwed the plastic slides onto the slide. This will allow the slide to move along the groves cut in the hood. I used a counter sink bit and bronze screws. I still need to shape the piece so the top will fit and epoxy everything into place.


 Below is a picture showing the plastic black slides in the groves on the hood.


Problem: Now here is where the problem came about. The front hood template that comes with the kit measures 28 -3/4" wide.   The manual states that the width of the entire hood needs to be 30 -5/8"

So I used the pattern to cut the front of the hood. After dry fitting the slide into the hood, the math just didn't add up and it was too narrow!

Now the hood width should be 30-5/8". If  you subtract the 1.5" of the to side hood pieces, you get 29-1/8". So the front template is 3/8" too short. 

So for whatever reason I made the entire piece wider and when I cut off the piece with the template, I kept it. So to fix it, I just glued it back on. You can see it below curing. I then cut it to the proper width. I will be painting the hood, so you won't be able to see it. 


To cut out the piece I used my bandsaw and set the table on it to the angle.


Fiber glassing

The weather was nice today, so I took the opportunity to apply some fiberglass on the front bow sections. Both port and starboard. It is hard to see it, but I also installed another piece where the cabin deck meets bulkhead 2. This is to provide extra support for the tabernacle.


Here is the port side all wetted out. When I did the other cabin glass, I had epoxy all over the place. I applied it using a brush and was able to get it done, but it was not easy.

Tip: To apply epoxy on vertical pieces, use a roller. To get epoxy on the roller, I used a small paint tray I purchased. I mixed the epoxy and poured it into the tray and then was able to get some on the roller, roll off the excess and then apply to the glass. This worked very good for me! 


Wednesday, January 24, 2018

Rudder Work and Companion Way Trim

Rudder
Last weekend was very nice. Up in the 60's / almost 70. I was able to do some work.  For the Rudder, I was able to epoxy up one side and it has been curing for a few days. This weekend I plan to epoxy the other side. I used a combination of many clamps as well as some free weights to make sure I had enough pressure.

Below is a picture of everything all clamped up. I am using some work lights to help with the curing.


With using epoxy in the winter months,  it seems to thicken up to the point it is hard to pump out the resin and hardener.  I store the epoxy inside in my utility room and move it into the garage when I am planning on doing some work. I also bought new pumps for both, but it still seems to be hard to pump. This past weekend, I used a work lamp and shined it on the epoxy. I think this really helped with the flow.  It was enough heat to keep the containers warm. By the way in the winter months, I use the small jugs and fill them up from the larger 5 gallon ones. Easier to move around. 


 Companion Way Trim

While one side of the rudder is curing, I decided to work on the companion way trim. This was a little bit of wood working, but fun all the same. For both side pieces, you need to find the angle of the cabin decking. This was easy using a T-bevel. I then took this angle and adjusted the bandsaw / tilting the table to the angle and using the rip guide. The 2 side pieces were already milled from purchasing the timber kit, but I just had to cut.  I cut one and tried it on both sides to make sure it fit properly.  Without moving the bandsaw, I cut the other side piece.

The manual tells you about the one angle of the cabin decking, but looking at the plan drawings, it shows the topside cut at an angle as well. I forgot to mention that I used the rip guide on the bandsaw.  For the second cut, I kept the exact same angle, but had to adjust the rip guide.
I guess if you are milling your own pieces, you would have more to work with except for the 1 inch board that I had. I didn't want to take too much wood off.  Below is a picture of both port and starboard trim pieces. I guess the topside angle will cause any water to drip off to the outside.


Picture showing the too cut pieces. Oh the cat litter box with the top is what I store my epoxy in to take it into the house. It doesn't smell, but didn't want any comments from the boss!!!  Out of sight, out of mind!


For the bow section part of the trim, I took a scrap piece of wood to use as a pattern. It was wide enough to fit inside the opening, so I could mark the angle going all the way across.  I decided to make an exact template to then use to cutout the final piece. If you look at the piece on the left, you will see a pencil mark. This is the height I got from the 2 side pieces. I cut that out and then cut the final piece using that as a template. I first made sure the test piece fit right and it did.


Below is a picture of the 3 trim pieces epoxied and clamped up. I started to run out of clamps. :)


I will be trimming the long pieces later this week and doing the other side of the rudder. With it still being cold, I will start on the companion way hood. This should give me plenty of work to do.

Wednesday, January 17, 2018

Still Cold, but working on Rudder

Still very cold, so it is putting a damper on my boat building. Last Friday, I did have a good day and it actually got up to 70. I had the garage door open and was able to put the 3rd coat over the cabin decking. Before I did that I did a rough sanding using 120 grit.  Any large epoxy jobs will definitely need to wait until warmer weather.

After the 3rd coat, I started to work on the rudder. I figured this was some work I can do in the cold and I can get all the parts cut out and ready to put together. Hopefully this coming weekend I can epoxy.

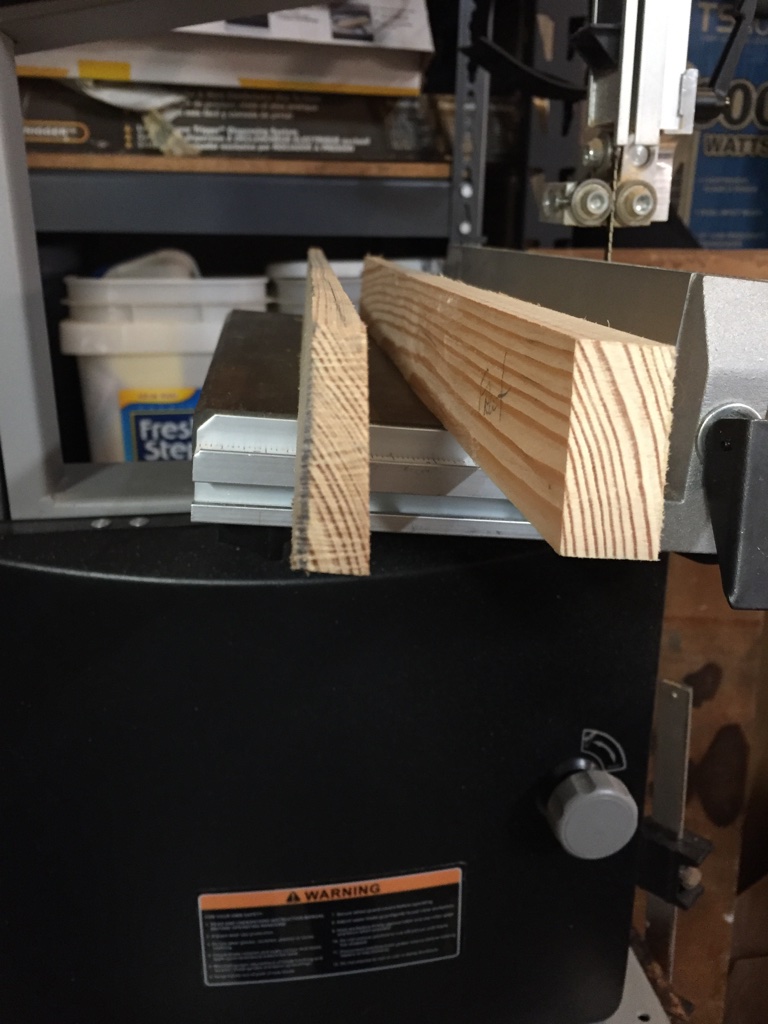
With the rudder, there is a taper going from front to back or bow to stern. This means you have to taper 3 different pieces of wood. The kit comes with the patterns, so you can easily get the rough pieces cut. The others I had to do some thinking and decided to use my bandsaw to cut them out.

So with the picture below, the taper is going from right to left. I just have everything clamped together waiting to be epoxied.


Below, I cut both of these pieces on the bandsaw and fined tuned them with a block plane.
The piece to the left is the long vertical piece and needs to taper down to 1/4 inch,
The one on the right is the bottom of the rudder and tapers from the 3/4 inch to 1/4 inch at the rear.


 Below is the horizontal piece. I just put the template on it and cut it out with the bandsaw.


The large triangle piece was a little more difficult. The manual shows using a grinder to shape the piece, but I don't have one. I decided to use my rasp to take the majority of the wood off after I marked it. I then used my orbital sander with 60 grit to do the finishing sanding. I think it took me all of about 20-30 minutes.


The dry fit looks like everything went together very well. I will just need to do a little bit of sanding once I get things glued down.  I also need to put another coat of 2 on the large plywood pieces.


Friday, January 5, 2018

Too Cold!

Old man winter has definitely put a halt to boat building. It has been basically below freezing for the last two weeks. I am unable to keep the garage at a comfortable temperature to work. It is supposed to warm up into the 40's next week and I can usually with a small heater raise it to the mid 50s to be able to work.

Before it got bitter cold, I was able to do some work. I installed the backer board for the tabernacle. I applied a large helping of thickened epoxy with cabosil. Then I used temporary screws to hold it in place from the inside and outside. I then rigged up a work light to shine on it so it would cure.


The method of a work light works pretty good as long as it is not too cold. The highs have been in the 20's with lows in single digits. I am ready to move to Florida!, but I think a lot of the country has been dealing with this cold. 

Below is a picture of coat number 2 of epoxy. I still need to get the 3rd coat on, but it will need to warm up some. Before applying the 2nd coat, I used 120 grit to do a light sanding to rough up things. 


I rigged up a 2x4 clamped to my work cart to hold the lights. 

I think with this cold, I may need to start working on some bench projects like the rudder and companion way. I can get things all cut out and epoxied using the work light method. I am afraid to do too much large scale fiberglassing until it warms up some. I have plenty to do, but it definitely needs to get a little warmer!