Friday, December 30, 2016

Continued Floor Board work! Round over complete.

I have removed all the floor boards and ran them through my router to round over the edges. I also completed the floor board lift out section on the port side and drilled finger holes to pull them out. I had to buy a new set of drill bits for my small drill press. I didn't have anything the size of 1" or larger.

Lift out section completed. 

Epoxy curing on additional floor cleats I added to support the floor lift out sections. 

Floor boards already to be sanded and finished. Round over with router completed on all. 

Picked these up at a place call WoodCraft on sale. They have a local store in the area. 
I think I am going to install a lift out section towards the bow of the boat. I can see me dropping things or some water getting in there just from going in and out of the cabin.  

Next up is sanding the floor boards, applying Danish Oil and sanding interior of the hull in preparation for painting. I also need to put some coats of epoxy on the wood cleats. The task list is never ending, but still having fun!!!!  


Thursday, December 22, 2016

More floor boards, fair curve and lift out sections!


I think I have said this before. It is funny how one paragraph in the manual will take you many sessions to complete. Installing the floor boards is one of them! I finished laying them in the boat with doing rough cuts. It took over 100, drill the hole, drill the countersink and then screw the screw in. I had to drill twice since the cheap countersink set I have was not long enough for the 1 3/4" screw. It took a while.

I did come up with an idea for the 2 outside boards on both the port and starboard side. The issue was that the outermost board did not have anything to screw into. Since I got the CLC timber kit, I only had the timber boards with the kit and they were all cut to 3" in width. I decided to cut the outermost board and screw it to the 2nd board to make 1 single wider board. They are only screwed together and I think I will epoxy them.


Notice countersink holes holding the two boards together. 

Final product. 

Once I got them all in, I used a piece of 3/4 floor trim to mark the fair curve. Pictures below show me using weights and clamps to hold the piece in place, so I could mark it. The process went pretty good.


Overhead view of fair curve marking.


Now that I have them all in place, it is time to remove them. I also need to do the lift out sections on both sides. I am still thinking about other lift out sections both forward and aft. When I was drilling the holes for the floor boards, I wanted them center on the floor supports. I didn't want any risk of the cleats splitting or the floor boards splitting. I decided to add an extra mini-cleat to support the lift out sections. 


Mini cleat to support lift out sections. 

Other mini-cleat. 

Work lights to help epoxy cure. 

Starboard lift out section. 

I have removed all the starboard side floor boards and completed the round-over of each with my router. Having the router on a table has made this job easy.  I have started removing the boards on the port side and will need to make that lift out section and do the round over on all the boards. I will need to sand them all and then apply some danish oil that I purchased.  I need to do some research on temperature limits for applying. There were no instructions on the can. 


Sunday, December 11, 2016

Lots of Floor Work Done!

I spent a lot of time this past week and weekend working on the floor boards and have made a big dent in it.

I made some tools to help with the process. The three pieces below are spacers for the 1/8 inch space you are supposed to leave between each board. I used some spare pieces of wood and some old roofing nails. They worked pretty good.


Below shows them in use. 


The first 3 or 4 boards that are installed on both sides of the centerboard are full lengths, so there is no need to cut angles so they will fit up against the hull. As you work out, you have to start doing a rough cut of the boards, so they will fit. 

To help measure where to cut the floor boards, I cut a piece of wood that was the same thickness as the floor boards and was 3 1/8 Inches. The boards are 3 inches and the 1/8 is to compensate for the gap you are supposed to leave. 

I used the piece of wood below to help mark where to cut.  I would start at either end and hold the piece of wood up to the already installed board and move it until it touches the hull. I would then mark this on the floor board to be cut. I would mark that spot on the outer edge and draw a line diagonally to the inner edge that touches the already installed piece. The result would be a triangle piece of wood being cut off. I hope this make sense. 


To make sure all the screws were lined up, I made a template to mark and then drill the holes. 
You can see the holes I used to mark. I used a center punch/ice pick sort of tool to put a small hole to allow the drill bit to have a small indentation to sit in, so to not slip and damage the boards. Each screws are in the exact same place on each board. You can see how I marked them below. The center pencil mark is to line up on center. The two outside lines are to line up on the outside edges of the floor supports. 


I would say I have easily 17-18 hours of work just on what I have done and I still have the outer most 2 boards to go on both port and starboard. 


Below are some pictures of the boards installed. I am using some pieces of scrap wood to work on to not scratch the boards. Glad I did since I have dropped the drill or square more than once. I am also happy to say, I have only dropped one drill bit below the boards! lol. 


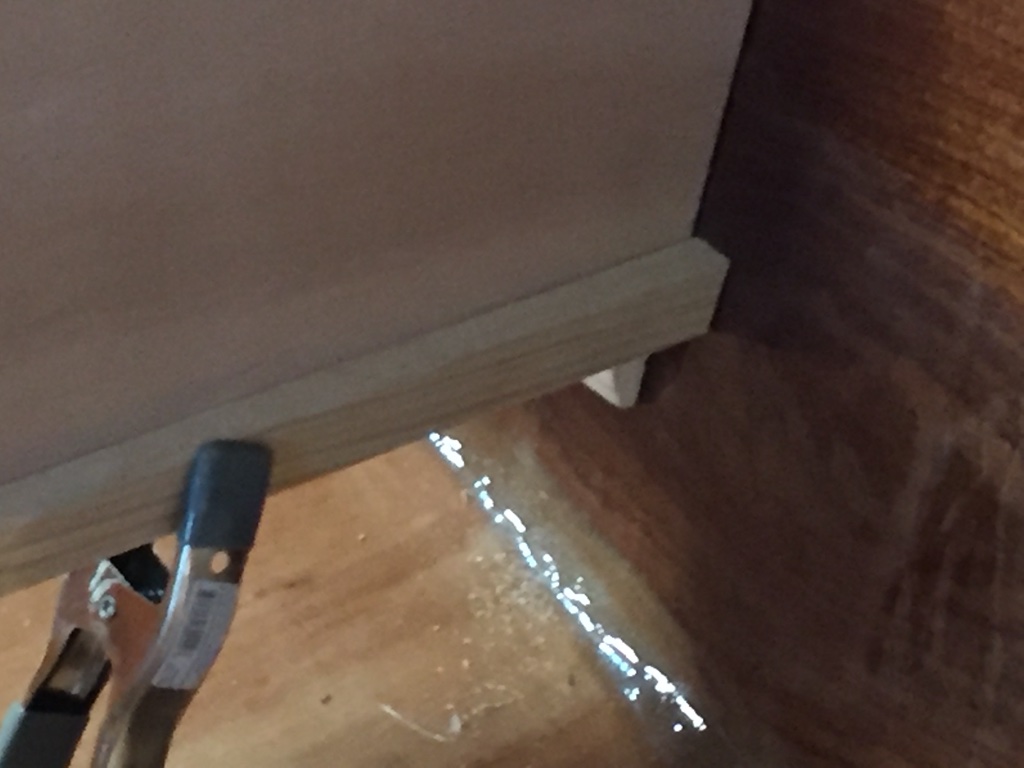
Notice the triangle cut I was trying to explain earlier. The upper or out edge  is marked by the little piece of wood. 

More pictures of floor boards. I used the brush to get the saw dust out of the hole. The black bag is something I picked up last week to help carry tools into the boat and also to offer protection to the boards. 

Notice the small tray on the board. This is one of the screw trays that  has a magnet. This helped a lot to have some place to lay my drill bits and center punch. I think this help to not loose any tools underneath. 

I have the last two boards on each side to do, but I need to figure out how to install the last board. There seems not to be enough floor cleats to be able to screw into or at least with the length of screws I have. I may need to get shorter screws or figure out another means. 

Still pending are cutting out the floor access as well as trying to figure out how to deal with a little bit of warping of the floor boards. I have some ideas. 


Friday, December 2, 2016

Sanding and floor board work. "Frearson Bit Needed"

The bronze screws that came with the CLC hardware kit are different than Philips head screws. I am glad I read that on another blog. They use a special bit called a " Frearson Bit" .  And like most non-professional boat builders, I didn't have one. I found the bits at Jamestown distributors, so I placed a order. They should be here any day.

Since the are being shipped, I am at a standstill on the floorboards, so I started to sand the interior. I have gone over the interior once with 80 grit and plan to start using 120.


1st pass of sanding with 80 grit.

I did make the cuts on the two boards that go up against the centerboard trunk and they turned out ok. Below is the port and starboard floor boards #1.  I marked them in the boat and then used my bandsaw to cut them out. They seem to fit pretty good with about 1/8 of clearance.
As soon as my Frearson bit comes I will start screwing them down. The new cleats I added on bulkhead #8 also turned out good. The floor boards seem to be level.

I will note that there is an error on bulkhead #2 where you put the cleat. If I recall, it is about 1/2 too high and I had to lower it by 1/2".  I read that on another blog and adjusted that when I applied the cleats.


Work and personal life with the holidays have limited me some this past couple weeks. I am going out of town this coming weekend, so not a lot of free time. 

Saturday, November 26, 2016

Floor boards too short!


I  had to add an extra floor cleat to support the floor boards.  I purchased the timber package, but my floor boards seem to be about 3/4" too short. Not sure how that happened, but I have decided to add another clear to bulkhead #8 to support the floor boards. I figured there would not be a lot of pressure back there from someone's weight and you really would not see it, since it will be out of the way.

I added a cleat to the front of the cleat that was already installed on bulkhead #8. This will allow me something to support the floor boards since they are too short. I have a work light to help the fillets cure since it is starting to drop in temperature in the garage.


Added cleat curing with work light.  

Today I spent some time sanding the interior in preparation for painting. I also used my dremel tool to open up the drain holes on the floor supports. I still have a lot more sanding to do, but decided to start on it and will probably do little at a time, so to not make it so tedious.

I started to sand the port side in preparation for painting.

Wednesday, November 23, 2016

More Cleat work!

We decided to take a weekend getaway this past weekend, so didn't get any work done on the boat.
I was able to get some small items done last week. As you will find if you are building, there are a lot of small little projects, that really don't show a lot of progress, but are necessary. I usually try to work a couple hours multiple days of the week. I can usually get one or two small tasks completed in a session.
I also moved my epoxy inside and plan to use smaller containers instead of the 5 gallon containers that come with the epoxy kit. It is starting to get cold in Virginia. I will fill up smaller containers of resin and hardner that I can move inside, so they will stay warm. I have an old bucket that has a top that I plan to use to move back and forth into the garage.


Side footwells with multiple coats of epoxy.

Installing the cross cleats to support the deck. Also had to cut out the notches on bulkhead #8.  

Port side deck supports epoxied in place. Note the notch for the other cross support. 

Starboard deck support on Bulkhead #8. I would recommend cutting a little smaller. I had to use some chimes to hold it in place. 

Rear bottom footwell support on transom screwed and epoxied in place. 

Sunday, November 13, 2016

More Inside Cleats


I continued to work on the inside cleats this week and I am about 80% complete. The tasks are a good exercise in geometry. I have been taking it slow, so I make sure I have the right angles and lengths. It has been a lot of fun. Below are multiple pictures of what I completed a few days this past week. 

The cleats on the rear transom need to be cut out, so you can add another cleat that goes from stern to bow. I cut out a portion of the cleat before hand, so I could  epoxy one piece of wood and keep everything straight and level. I cut each side and then used a chisel to cut out the piece.  Once this cures, I will completely cut out the section and add another cleat that fits in the space.  You can see the notch below. 


Close-up of the real horizontal cleat on the transom.


Below are the cleats that fit on the center board trunk. They need to be notched out in a curve as they fit up to the bulkhead 7 fillet as well as have a round-over on the side that will point down towards the floor boards. 


I cut the cleats on bulkhead 8 and epoxied them into place below. Again any edge that faces down to the inside of the cabin/floorboards needs to have a round-over edge. On all these pieces, I used the router table that that I borrowed to do the round-over cuts. As an option, you could use a block plane and sandpaper. I had to do that in a couple instances because I forgot to run them through the router. 


I started to sand between bulkheads 7&8 yesterday. I will still need to go back over before I apply a coat of paint primer.  Above the cleats are epoxied and screwed to the transom. 

Another view of the sanding. 


Another view of bulkhead 8 cleats epoxied in place and clamped. 


Vertical cleats on bulkhead 8 epoxied and clamped in place. 

Bulkhead 7 horizontal cleat in footwell section epoxied and clamped in place. 

Vertical cleats epoxied and clamped in place. 


Additional cleats on the footwell sides epoxied and clamped. 

I did a lot of dry fitting before I would apply thickened epoxy with cabosil. I wanted to make sure I was getting everything straight. I would recommend you take your time on these, because it would probably be a lot of work to try and remove a cleat glued in the wrong place. My wife came out yesterday and asked what I was doing. I was just standing there looking at the boat. I commented that I was thinking!! :) Just making sure I had everything right!

Monday, November 7, 2016

Cleats for Cockpit Deck!

 I was able to get a lot accomplished last week and weekend. I probably spent a good 10-12 hours. I started to work on the interior cleats that will support the cockpit deck. I decided to do it a little differently than the manual states to find the locations of the side cleats. I used the actual footwell sides with a cleat cut to fit the exact dimensions of the footwell side. I held it in place with a clamp and set both in the positions they would be in.  I also inserted the footwell bottom piece to get the correct dimensions side to side.

I then used multiple levels to find the location of the cleats on the rear transom. I have them screwed into place now and will epoxy later after I cut the notches.

Cleat attached to footwell sides with clamps. 

Another view of footwell side with cleat temporarily attached with clamp. 


The side and rear cleats on the sides of the boat and transom have to be at an angle. I remember reading another post about cutting them at 15 degrees. I used a tool to mark the actual angle and it turned out to be 15 degrees. So I setup my table saw and made a couple test cuts and made sure they fit into the notches on the sides of bulkheads 7 and 8. Once I got the angle that I wanted, I cut both sides. I then cut the 2 horizontal pieces that get glued to the transom.

The next job was to do a round over on the all the pieces that will be exposed on the inside of the boat. I just realized that I missed 2 pieces with the round-over. oops! They are the horizontal pieces on bulkhead 7. No big deal, I will use a block plane and some sand paper and fix them.  I setup the router and router table I borrowed from my dad and made a couple test cuts with scraps. I was using a 1/4 inch round over bit.


Cleat with 15 degree angle and round over. This is a scrap piece, so the final would only be rounded over on one side.

Below are some additional pictures of the finished cleats. I still have a lot todo, but I was able to complete 1/2 of them. The whole exercise is a lot of geometry and I would recommend taking your time and doing test cuts before cutting the actual pieces.


Transom pieces are just screwed in, so I could locate the position of the long side pieces. 

Starboard side horizontal piece glued on bulkhead 7. I bought a fine tooth blade the trim the extra wood off. 

Port side horizontal piece clued on. 

View of footwell sides temporarily held in place to measure. I think my process worked out well. Everything is level. 


Horizontal cleats on bulk-head 7. These are the ones I forgot the round over. 

Once I measured everything, I glued the cleat to one of the side panels.
I will be putting a couple of coats of epoxy on as well. 

Overhead shots of inside. Both starboard and port side long cleats are glued and screwed. The screws will be removed. 

Another overhead shot.