Monday, April 30, 2018

Just about finished fiberglassing the topside of the hull!!!

For the most part, I am finished fiberglassing the topside of the boat!!!!!! Yea!!!!!!
I still have some filler coats to do, but all the fiberglassing is done.

An oh yeah and that dreaded sanding part still needs to be done!!!! 😟 I may do some now and just wait until after I flip it over. I am sure I will have some dings to fix, so no need to make final finish until then.

Hard to believe I am talking about flipping the boat!!!!!

Companion way slide
I finished up the slide with applying fiberglass and 3 coats of epoxy. The corners turned out better on the slide than the companion way hood, so I was pleased. I still have them overlapping, but I didn't have as much on both pieces. I cut one short and then just had the other wrapping around. I think my mistake on the companion way hood corners was just too much fiberglass and it didn't want to lay right.

Fiberglass ready to be wetted out. I have it sitting on 2 - 5 gallon buckets. 

1st coat

All ready for the trim piece and sanding. 

 I still need to install the trim piece, but I will take care of that soon.

Cockpit Fiberglassing

Well this section was a royal pain in the you know what. I still have problems with doing vertical fiberglass. It turned out ok, but I had to fuss with it a lot. I used a plastic spreader on the floor part and tried to pull the epoxy up the sides. I then used a roller and cut off chip brush to apply to the corners and to use on spots. Having to work on your knees leaning down is not an ideal work position, but I survived. I planned to have both cockpit seats done and to do this part last, so I had a place to climb into the boat and work on the area.

Oh and prior to doing the fiberglass, I went over everything with a sander to make sure there were no bumps. Doing the other areas, I had some epoxy runs that needed to be removed.


Ready to be wetted out. 

All wetted out and ready for 2 more coats.
This was the last piece on the cockpit seat area. I had to be careful not to clog up the centerboard pendant hole, but I just took it slow and worked around it. I didn't have to go this wide with the fiberglass, but having 2 layers where you will be stepping into the boat will help to firm it up. 


All wetted out and ready for multiple coats.


Transom Skirt Fiberglass 

I was a little worried about how the fiberglass would lay in this area, but it actually was not too bad. I used some blue tape to hold in place and wetted out the outside of the transom skirt first. I then used a roller and rolled it from outside over the top. I then used a chip brush with the brushes cut to dab the epoxy on.

Once I flip the boat, I think I will climb under and work on that area a little. I need to run a piece all the way down the seam.


I cut a dart in the middle and then a couple on the inside. 

Below is the transom skirt all wetted out. 


I forgot to get a before picture on the piece that goes from the seats up to the bottom of the skirt trim. I used thumbtacks instead of blue tape to hold it upright. This piece of vertical was not too bad. While holding the top, I rolled from the bottom up. I also learned to take it slow. I sometimes would rush and trying to go fast just pulls the fiberglass.
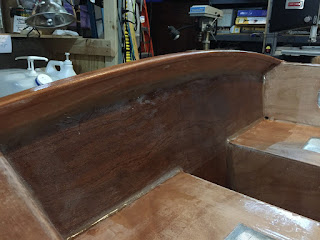
All wetted out. 

Heading down to the Beaufort NC Boat Show this weekend. Looking forward to seeing all the boats and talking with other builders!


Monday, April 16, 2018

Sanding and Fiberglass in Cockpit Area!

I decided to sand some on the areas in the bow and cabin that I have already fiberglassed as well as the cockpit area I planned on fiberglassing this past weekend. Sanding is always a fun task, but I will say the new sander is much nicer and does a quicker job. While sanding I noticed some areas where the epoxy was sort of flaky. I assume it was due to me trying to epoxy in the garage when temperatures were marginal or close to 60. Not a huge deal. I sanded them down and re-applied epoxy over the areas.

I also took some time this past weekend to get my epoxy station back in order. Over the winter, I was using smaller jugs and storing them inside. I think it has warmed up enough, so I have the big 5 and 1 gallon containers back in the garage. I re-primed the pumps so I would get the appropriate amounts.


Slide and Rudder
For the companion slide, I was able to re-apply thickened epoxy over the screw holes and the second application filled them completely. I then had to re-sand everything. The slide is ready for fiberglassing.  I also filled the holes on one side of the rudder and sanded them smooth.


Filling brad nail holes. 

2nd attempt at filling screw holes top and sides.

Below is a picture of the slide sanded and cleaned. I will probably apply the fiberglass later this week. The piece of wood on top is going to be the trim. I have yet to cut it out and fit.


Cockpit Fiberglass

Below is the fiber glass laid out ready to be wetted down with epoxy. As I stated earlier, I sanding the area good and then whipped down to make sure the area was clean. Making the fiberglass lay on the many different angles is a challenge. After some time, I finally got it to where I wanted it or as best as I could get it.

I would estimate that it took me 2-3 hrs. to lay the fiberglass and then mix up enough epoxy. I counted 6 red cups when I was done. I used a plastic spreader on the horizontal parts, but then used a roller to get the vertical as well as a chip brush in the corners.

Fiberglass ready to be wetted out. 


Below are a couple shots of the 1st coat wetted out. I will be applying the 2nd and 3rd coats after work today and tomorrow.


Next up will be the foot area in the cock pit. This is going to be a fun area with the location and angles. Glad it is not that big.  Its coming along slowly but surely!


Thursday, April 5, 2018

Will Winter ever end? and Fiberglassing the Companion Way Hood

Well "Old Man Winter" doesn't seem to want to go away, so I am still sticking with the bench projects. I can't wait until I can do the large fiberglassing. I am over 50% done. I just have to do 2/3rds of the cockpit area and transom and then I can start on the rub rails.

Home chores took over last weekend and I was only able to work on the boat for a couple of hours. Had to change the oil in the lawn mower and cut my 3/4 acre lot! :-( And this weekend we are going out of town again, but I have to keep the boss happy! Oh, did I mention they are calling for more snow!

I was able to sand the epoxy filled holes on the companion way hood, but the holes didn't fill up to the top on the slide, so I am going to have to do another fill with epoxy. Something I didn't mention on the screw holes. I originally drilled the holes with a counter sink bit and it was 1/4 inch in diameter. So my original plan was to fill them with wood plugs, but the 1/4 inch wood plug bit I bought created plugs that were too small. I guess I could have used them, but at the last minute I decided to just fill with epoxy.  They seemed too loose. I didn't have time to think too much, because I already had a cup of thickened epoxy mixed.

Below is the fiberglass ready to be filled with epoxy.


Below is the companion way hood all wetted out. I did have a problem on both corners where the drains are going to go. For some reason each side got a bubble under the overlapping glass. I discovered this after the 1st coat and cut it out and sanded. I am trying to decide how to handle applying fiberglass to a quarter size hole. 

One possible solution is to run fiberglass down both entire sides. I have looked on other blogs and don't see where anyone did this. That option will cover the hole where the bubble occurred and also coat the long side pieces all the way down with glass. I find it interesting that I had a bubble on both sides, but the fiberglass laid perfectly over the small trim piece on the top.


Since I have to redo the plugs, I just decided to coat the inside of the slide with epoxy as I was applying the 3 coats to the hood.