Sunday, January 29, 2017

Battery Platform and Sanding

This past week was pretty busy at work, so I was only able to work on the boat a couple hours.  After the initial epoxy dried on the battery platform, I took some thickened epoxy and put some fillets on both sides of the supports. This will give them some needed support with a heavy battery moving around while sailing. The battery box does have a tie down strap and I will be cutting out an area on the platform, so it will fit properly.

I also put a coat of epoxy on both the battery platform supports and the cleats for the wire conduit. I will put another coat on them before sanding, priming and painting.


Battery Platform with fillets for support and a coat of epoxy.  
I kept the lights on the epoxy for at least 24 hours to allow it to cure some. I will wait a few days until I start to sand, so they can fully cure. 


Another view of fillets. 


 Below for the battery box platform and the conduit plywood, I put a coat of epoxy on them for water proofing. I plan on applying another coat and then multiple coats on the other sides. For the battery platform, I am going to apply fiberglass on the underside to provide some extra support. I have some scraps I saved that will fit fine. 


Today I was able to spend a lot of time working on the boat. I decided to sand and sand and sand some more. I think I spent about 4 hours sanding. I am tired now and sat in the hot tub and drank a beer when I was done. I will definitely be going to bed early tonight! With all that sanding I am getting very close to being done and ready to paint. I vacuumed everything and plan on going back over everything  and doing some final sanding this week. Hopefully work will not be so busy this week, so I will have the time in the evening.

As you can see below, I went through a lot of sand paper! The sand paper doesn't last that long and I change it very frequently. You will definitely need to stock up.


Below are some pictures of everything sanded and vacuumed. Like I said, I will go over everything again and get the spots that need some final touch up.  This shouldn't take more than a couple of hours. I will then be ready to start priming!! Yea!!!!!!!! I am definitely ready to move. 


Monday, January 23, 2017

Battery Platform and Cable Conduit

I have been thinking about the electrical system that I wanted to install on PocketShip. It is not going to be that fancy. I just want running lights and some outlets for USB. I may change my mind later, but I will be able to add whatever I need.

Before I start to paint, I wanted to build and install a few things. One was a battery platform and the other was a conduit to help protect the electrical cables in the locker area. I will have to say that I copied William's design from Florida. http://pocketship.blogspot.com/. Thank you William!  I like what he did on his particular build.

I purchased a plastic battery box from West Marine. It holds both Type 24 and the larger 27 batteries. I am still reading up on all of the electrical stuff. To sit the battery box on in the locker area, you need a platform. I used some scrap pieces of lumber I had an built the platform.  You will need to cut compound angles, but that was not that difficult using sliding t-bevel.

Battery Platform 

Multiple Angles needed. 

I have the top piece of plywood screwed down temporarily so I can epoxy the whole section in place.
I will remove the plywood when the epoxy cures and put some fillets on both sides of the supports. I also need to cut the platform and glue some pieces of wood to hold the box from moving around. I will post those later.

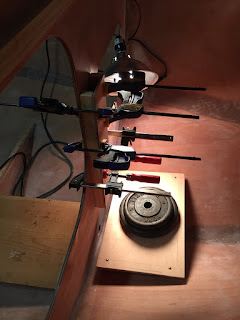
Below is a picture of the battery platform being epoxied (thickened epoxy with cabosil). I used some free weights I have to put some pressure to hold it in place.


The next piece is a cable conduit to hide and protect the cables coming from the battery to the panel that I will be making and also for the cables that will support the various lights. I used some scrap plywood and cleats. Again I have the plywood screwed in place and will probably keep the bronze screws to be able to remove the piece for maintenance. 

Cable conduit before epoxying. 

Cable conduit glued in place. 

I am using work lights to help the epoxy cure as you can see in both the pictures.  I moved the lights to be more inside the hull and have a blue tarp covering them to help keep the heat in. 


Below is the gluing of the side pieces to help support the bow deck when I glue that down. 
The instructions say to use 3/8 x 1 inch material, so you don't warp the shape of the side panels. 
I found that some old scrap plywood was just about 3/8ths inch and use it. I had to bevel the top edge to make a flat surface to epoxy to. These pieces are really not for support, but to only provide something to epoxy to. 

Strips glued in place to hold bow deck. 

I spent most of the week working on these small pieces. I did manage to do some more sanding and still have that to complete before I can paint the interior.


Wednesday, January 18, 2017

Sanding And Interior Paint shopping!

Yes, I am still sanding. I did another 4 hours last Saturday and finished up the bow section between  bulkheads 1 and 2. This area is tight to get into for my 230 lb frame, so I picked up some new tools to help. I think another 4-5 hours of sanding and I will call it done! Or at least I hope thats it.  Then time for a paint party.

Sunday I  decided to go out to West Marine and Lowes to look at paint. Lowes didn't have any oil based paint that looked  like it would  be appropriate for my application after seeing a lot online. Most of it was for metal. I plan to look at Home Depot this week. I may need to order online. It did start to purchase rollers, trays and paint supplies to start the interior painting soon!

West Marine is on the high side for the Interlux Paint, but I needed to pick up some Interlux 333 thinner for the Interlux Pre-Kote primer I bought. Still not 100% I am going to try it on the interior, but definitely will use on exterior. It all depends on what I find for oil based paint and primer at the other stores. I am not going to waste a lot of time and money riding all over town.

While I was shopping, I purchased the wand extension for my Dremel tool I bought earlier in the year. It is nice to get the epoxy smooth on the fillets and cleat areas. It's like using a pen with a small sanding wheel attached. You do need to be careful.  It can do some damage. Just minor nicks! :-)


I also found this small yellow sander that is about an inch wide. It works good for tight areas as well.
It came with 12 sheets of 120.


Monday night I put the 2nd coat of epoxy on the internal deck support cleats. Since it has been somewhat cold here, I have been using the tent method and work lights to help it cure. Hopefully it is cured by this weekend to finish the interior sanding.

I also started on some other small items the last couple of nights and will post them later this week.


Thursday, January 12, 2017

Sanding, Sanding and More Sanding!

I have been sanding, sanding and yes more sanding.  I reference a lot of the blogs all the time and read where builders talked about all the sanding they had to do and I guess it really didn't hit home until I got to this point. So far I have worked multiple sessions of about 8 hours on sanding, but that is an estimate and it could be more.  I have my headphones on and get in to a zoned out mode and just start sanding. I need to figure out how to connect some music to the already supplied connector on my headset to make it more enjoyable. 

With all this sanding, I guess I am having to pay back the epoxy gods for some of my bad "fillet" work I did. Mainly in the areas of the floor supports. It has been a real challenge trying to get it smooth. My process is to sand with 120 then 220 grit, but in that area I pulled out the 80 grit. I use my fingers to feel the smoothness and call it done when there are no rough spots. 

If I sound like I am whining, I am.  Just you wait if you are building!  ðŸ˜·ðŸ˜· funny I found smiley face with a dust mask!  But seriously, there is a lot and I will be at it for multiple more sessions. I will make the best of it and maybe put some small projects in here and there to break things up, but I am motivated to get it done.

No real pictures, but I will take some of the finished product and post later this weekend. 

Also if there are any questions or more information anyone would like, pictures, etc.  please let me know.  I am out here rambling on, but I know someone is reading this. I like keeping the record of what I have been doing. 

Saturday, January 7, 2017

Winter Storm Day and a Good day to do some Sanding!


Well we got hit with a snow storm last night and today in Virginia. We got about 7-8 inches, so it was not a lot to do outside. With the bad weather and low temperatures, it was all I could do to keep the temperature in the garage at 50 degrees. 

So with that in mind, I decided to sand the interior. I still have a lot of sanding to do before I can start painting. I have gone over the interior with 80 grit and I spent today on the port side using 120. I made a lot of progress in the 3 hours I spent sanding. I still need to figure out a better means to sand the fillets in the floor board sections. They are somewhat rough and it is hard to get any tool in the area to make them smooth. I have a detailed sander, but the space if very tight. I know there is a lot of sanding to do and I will keep at it until I figure it out. 

I have read other blogs about doing what they thought was more sanding than necessary. I may do some test areas with some of the primer paint to see what it covers. The primer may cover up the problem areas I am thinking I have. 


Friday, January 6, 2017

More Floor Boards and dealing with Winter!

Winter has definitely arrived in Virginia and it will be a challenge to work on the boat for the next few months. Not to say that I won't be able to do anything, but I will need to pick and choose. I think I will have many things that I can do. Winters in Virginia are fairly cold, but it all depends on the season. We do have days of warm weather in the upper 50's / low 60's and I will need to plan around those. My garage is not heated, but I did add insulation to the garage door last year and I have heat from the main house on 2.5 sides. As long as it doesn't get but so cold, I can keep it in the 50's with a portable heater and work lights.

Below is finishing my work on the floor boards. The problem I mentioned early about not having anything to screw the outer most floor board too, I decided to epoxy/screw them together. Since it was cold in the garage, I used work lights to heat them for a couple days. 

Floor boards epoxy curing with work lights. 

Another view. They turned out pretty good, but I will need to sand them. 

A note to builders that purchase the timber package. You get all the correct wood and it is good that I got the milled package. Epoxying the outer 2 boards together worked fine. Having them milled, all the boards were square and same dimensions, which allowed them to look as one board when finished. I will post some more pictures of the finished floors when I get them completed and installed.


I have been looking/thinking about the lower breasthook for a while. Again I purchased the timber package and what was provided fit for the most part. Looking back, I think I would have put the lower breast hook in temporarily prior to doing any fillets and connecting the bow area. The piece of plywood that will go in the anchor well fits pretty good, but I will have to shave off a little to make it fit perfectly.
I think the word of caution is to think/read ahead and figure out the next move. The entire boat is a big puzzle and a slight movement of one part can cause other issues in other areas. With the kit, I have found that for the most part, things fit 99.9% of the time.

Lower Breasthook finally installed. 

I installed all the cleats, but have yet to put any epoxy on them. With all components, it is recommended that at least 2 coats of epoxy be applied on all components. Below are some pictures of after one coat of epoxy. I will put another coat on next week when it warms up a little.


As I mentioned earlier it is getting cold in Virginia. This weekend it is calling for a low of 6 and 9 degrees. I have been using a work light and plastic to keep it warm enough for the epoxy to cure. With temperatures calling for lows of 6 and 9 degrees, it will be difficult to keep anything warm. I have been using a single light to help with curing the epoxy on the cleats.  With the plastic and work light, I have been able to keep the temperature in the low 50's with only a single work light(75watts). As a test, I will keep the lights on and monitor the temperature. 

So how am I monitoring the temperature. I have a thermometer that has an outdoor sensor. I have placed the outdoor sensor inside the boat or anywhere in the garage I want to monitor. I can look at the high/low temp on the indoor unit to see where I am at. I have had this for many years, but I would recommend purchasing one. They are fairly cheap at any of the big hardware stores. 


I read a lot of the other blogs as references and I would recommend that any new builders do so as well.  There is a lot of great blogs out there and I reference them every time I get to a new step in the manual. I am doing this blog to help me remember how things came together, but if there are any question out there from readers, please let me know. I am definitely not an expert at building PocketShip. In fact this is the first boat I have ever built a boat.  If anyone wants to see anything specific let me know and I will be happy to take pictures. I am also thinking about taking some video in the coming weeks of the build.