Monday, July 31, 2017

Seatback Framing, Stringers and Transom Skirt

I finished up all the seatback framing and started to apply epoxy to seal all the stringers. I will need to put 1-2 more additional coats of epoxy on them, then I can start to install the floatation and close things up.

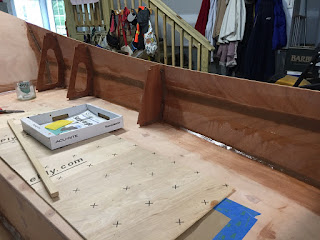
Below you can see some of the pictures of the standard stringers and some of the additional stringers I installed. Below shows one of the stringers that will help support the seatback on the transom.


Below is a picture of the stringers after I leveled them out using a plane. This was actually a lot easier than I thought when I first started todo this area. I used a chisel to get the edges closest to the rear cabin wall and transom.


This is the port side all installed.


Below is a picture of the stringers and block at the transom on the port side. I was glueing the extra piece of stringer to the transom as extra support. I actually used a piece I cut off on the bottom stringer. It had the angle that I needed and was already made.  So don't throw your scraps away to quickly.
I used a clamp on the top of the piece, but had to us a screw on the bottom. Be careful not to drill through!! :)


The manual calls for blocking to be place in 3 places on each side. They will support the hardware block you will install last. I was able to cut the blocking and plane it so it fit properly.  I opt'd to go with thicker blocking based on some of the other blogs I read. In the manual, it looks like they used another piece of Okoume plywood. 

Below I am dry fitting the pieces and using a plane on the edges to make sure they fit properly. I will apply multiple coats of epoxy to seal them up before glueing them in place. 


Below of the pieces of blocking I am using. I have one coat on them and the epoxy is curing.


Below is the transom skirt. I have been playing with it for about a week looking at the best way to install it. The manual shows the inside edge of the skirt flush/even with the inside edge of the transom. Pg. 176 shows a good picture of how to install it.  

I did a dry fit and got it close to where I wanted to install it. I then drilled one hole through the skirt into the blocking on both sides. I used a finishing nail the same size as the holes and laid down a large bead of epoxy from a pastry bag. I used the nails to line things up on both sides and then just pushed the skirt down. It slides on the nails and goes right into place. I think this method helps, so you are not sliding the piece and getting epoxy all over the place. I did have to use a brush to move the epoxy, because I could not see the pilot holes for the nails to go in. I then drilled some additional holes and used drywall screws to hold in place. I was actually very pleased with the way it turned out. I took a fine tooth saw and cut the extra piece of wood on the edges off, so they are flush with the sides. 

I wanted some weight in the middle of the skirt to hold it down, so I used clamps to hold weights in place. 


I used 2 clamps to hold the horizontal and vertical position of the small stringer on both sides. The small blocking shown in the picture below was a little difficult. I messed up a couple pieces, but I also was trying to rush one night after work to get it done. Rushing in boat building does not work! Actually rushing doing anything usually causes problems! :-)


Another shot of everything glued/clamped in place. On the starboard side I broke the glue joint playing with the blocking, so I had to re-epoxy the piece in place. I used a screw through the transom skirt to hold it in place. I hope this holds. I think I will leave it there until I get the blocking glued in.


Below is the skirt in place with the epoxy fillet on the inside. This will need to be sanded smooth, since I still can't do fillets very well. Oh well I like sanding!


I started on the seatbacks and epoxied the flanges into place. Below is a couple of pictures. 
I have cut out the holes, but still need to use my router to do a round over on the edges. 


Things are slowly coming along. 


Thursday, July 20, 2017

Bow Foredeck Fiberglass and Seatback Stringers!

I sanded the bow area fillets and made everything smooth prior to laying down the fiberglass in the bow area. It has been in the 90s to 100 degrees, which is NOT good epoxy working conditions, but I have managed. I can't remember which member of the forum that suggested it, but I have been using a container of ice to help keep the epoxy cool to delay the hardening. It has worked! I cut the fiberglass to fit and then over multiple nights put the 3 coats of epoxy to fill out the weave.

Below is the fiberglass cut to fit. You can see the different cuts, so that it will lay properly. I used a combination of brush, roller and yellow plastic epoxy spreader. The more fiberglassing I am doing I am finding that the yellow epoxy spreader works very good for the initial 1st coat. The roller seems to stick/pull on the glass. However the roller is definitely the way to go on coats 2 and 3, using the brush to get the corners.


While doing the multiple coats, I have also been working on the blocking on the upper transom. This was a fussy to say the least task. I will have to admit, that trying to rush a part of this type after work, just to get it done is not the right approach. I wasted a few blocks by not properly thinking it through. When I had more time, my work definitely improves. I have learned this to some extent. I try to save the complex cuts/tasks to the weekends and the simple tasks of just applying a coat of epoxy to fill in the weave to during the week after work. Boat building is not a hurry up and get it done process!


Below is  a few pictures of the upper transom blocking. You can see the different angles that I had to cut. I will also note that the manual show installing the stringers first, but if you did that you would have stringers epoxied to the upper panels and would have to remove it. Another note to read ahead in the manual to plan the next step. I used some temporary drywall screws to hold in place while the epoxy cured.

Starboard blocking.


Port side blocking


Below is the upper stringers on the outside edge. These went on pretty easy with no fuss. 


Now the manual talks about being very careful as you put on the upper inside stringers. Now I try to be careful, but trying to drill a pilot hole in the middle of a 1/4 inch thick piece of wood seems pretty complex / stressing to me.  So looking a the other blogs, specifically Jeff''s "Old Soul" , he installed small stringers on the seatback supports. This will allow more area to drill pilot holes to hold the seatback piece in place.  Below you can see where I did this on the Starboard side. I plan on doing this on the port side as well. 


Close up of the stringers not specified in the manual, but will make things easier.  Also be sure to coat all the edges with epoxy prior to installing.


This weekend in Virginia is calling for a high of 100, 100 and 96. I plan on working on the boat and will get as much done as possible with the heat!  At least I will loose some weight in the sweatbox boat building shop!!! 😀  , but still enjoying working on the boat!!  Working on the boat in the extreme heat beats even the best day at the day job!!!!!!!!!


Monday, July 10, 2017

Cabin Sheer Strips and Seatback Framing Stringers

I finished up on the 2 additional coats of epoxy on the fiberglass tape on the joint between the upper and lower side panels. I also decided to add a strip of fiberglass tape to the bow area where the decking meets the upper side panel. There is only fillets in this area above and below, but I wanted some added strength since I will be standing there as well as the anchor will be located in that area.

Below is a picture of the tape installed. I will need to add 2 more coats of epoxy.


Once I completed the tape, I decided to tackle the sheer clamps that run from the bow all the way to the rear cabin wall. These will mainly be used for looks in the bow area, but will support the cabin decking. It took a while to get them to fit properly and I still had a small gap against the rear cabin wall, but nothing a little thickened epoxy can't fix.


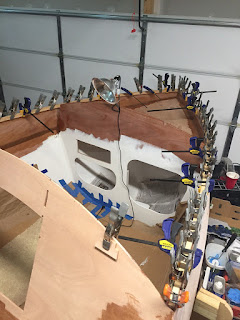
Below is a picture of everything installed. I think I used every clamp i had or the majority of them.


Another picture of the sheer clamp epoxied in place. It was a challenge to coat everything in thickened epoxy with cabosil and then bend the pieces into place and have them line up properly.
I would recommend mixing just enough for one side and then do the other side.


Below is a picture the next day with the clamps removed. I will have to take a plane and plane down the edges, so the cabin deck fits properly.  I will wait until I get the dorade boxes installed in the bow area before doing this.  I did a dry fitting of the upper breast hook shown in the picture below and it fit almost perfectly. It is nice when things line up!


The next day, I decided to start on the Seatback framing and was able to get the bottom stringer epoxied and glued in place. I first had to mill the piece to a 70 degree angle and decided to use my bandsaw to do the cut. The normal rip guide would not fit, because the angle was so high. I had to create a guide and clamped it to the table with some C-clamps. It worked just fine. I have been using the bandsaw for about a year and also had to replace the blade.  A lot of setup and fuss for just cutting 2 strips. But it is fun!

Below is the guide I used to cut the stringers.


Below is both the starboard and port sides epoxied in place and temporarily held in place with screws. The screws will be removed. To support the stringers, I plan on putting some small fillets on the inside edge. Especially in the rear storage areas.


Monday, July 3, 2017

Bow and Inside Cabin Fillets and Tape

Well I have been neglecting my boat building again! We went on a trip to Manteo NC and had a good time. This past Saturday was the first day I was able to work on things.

I started by sanding the cockpit fillets lightly, so I could finish up applying the fiberglass tape on the upper side panels seam. It was about 80 degrees in the garage and the epoxy started to heat up very quickly. In a couple spots the epoxy started to harden before the tape was wetted out. I may have to sand those areas and reapply new tape. I guess it was a warning to me to remember the heat and mix smaller batches of epoxy. 

 Below is a picture of the bow area and fillets. The fillets could probably stand to be a little larger, but there are fillets above and below and the whole area will be fiberglassed. I may put some tape on the side areas where there is no support except the fillets below and above.  The piece of blue tape is on to remind me to drill drain holes. There are a few other locations that need drain holes. I will be better off doing them during the build, rather than at the end of the manual when they are mentioned.


I still need to install the "sheer clamps" before fiberglassing the bow area. The "sheer clamps" will allow for a surface to glue the decking to.


Below is a picture of the fiberglass tape on the starboard side. I completed all the taping now and just need to apply 2 more coats to fill the weave.


Below the inside of the cabin has been filleted.  I applied tape to both sides yesterday morning and will be filling the weave on ALL the tape joints during my next working session.


Below, I am starting to dry fit and find the location for seat back stringers. I plan on cutting some of the stringers during the next few sessions.