Below is a picture of the tape installed. I will need to add 2 more coats of epoxy.
Once I completed the tape, I decided to tackle the sheer clamps that run from the bow all the way to the rear cabin wall. These will mainly be used for looks in the bow area, but will support the cabin decking. It took a while to get them to fit properly and I still had a small gap against the rear cabin wall, but nothing a little thickened epoxy can't fix.
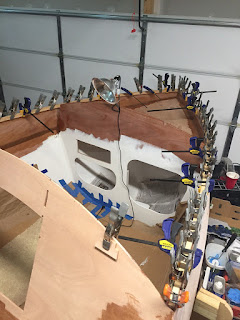
Below is a picture of everything installed. I think I used every clamp i had or the majority of them.
Another picture of the sheer clamp epoxied in place. It was a challenge to coat everything in thickened epoxy with cabosil and then bend the pieces into place and have them line up properly.
I would recommend mixing just enough for one side and then do the other side.
Below is a picture the next day with the clamps removed. I will have to take a plane and plane down the edges, so the cabin deck fits properly. I will wait until I get the dorade boxes installed in the bow area before doing this. I did a dry fitting of the upper breast hook shown in the picture below and it fit almost perfectly. It is nice when things line up!
The next day, I decided to start on the Seatback framing and was able to get the bottom stringer epoxied and glued in place. I first had to mill the piece to a 70 degree angle and decided to use my bandsaw to do the cut. The normal rip guide would not fit, because the angle was so high. I had to create a guide and clamped it to the table with some C-clamps. It worked just fine. I have been using the bandsaw for about a year and also had to replace the blade. A lot of setup and fuss for just cutting 2 strips. But it is fun!
Below is the guide I used to cut the stringers.
Below is both the starboard and port sides epoxied in place and temporarily held in place with screws. The screws will be removed. To support the stringers, I plan on putting some small fillets on the inside edge. Especially in the rear storage areas.


No comments:
Post a Comment