Monday, April 3, 2017

Floorboards almost done!

I think I worked about every night this past week, putting coats of Danish oil on the floor boards. I moved out into my shed, so the fumes would not be bad and I was getting complaints from my wife. I started off using a brush to apply the Danish Oil, but switched to a rag. The rag works a lot better to cover the wood and you don't get any splashes! I would let them dry over night and then used some steel wool to lightly sand. I think they turned out good. I didn't use as much Danish oil, so I will have a lot left over. I purchased a gallon, but could probably done with 1/2. I got it on sale, so oh well.

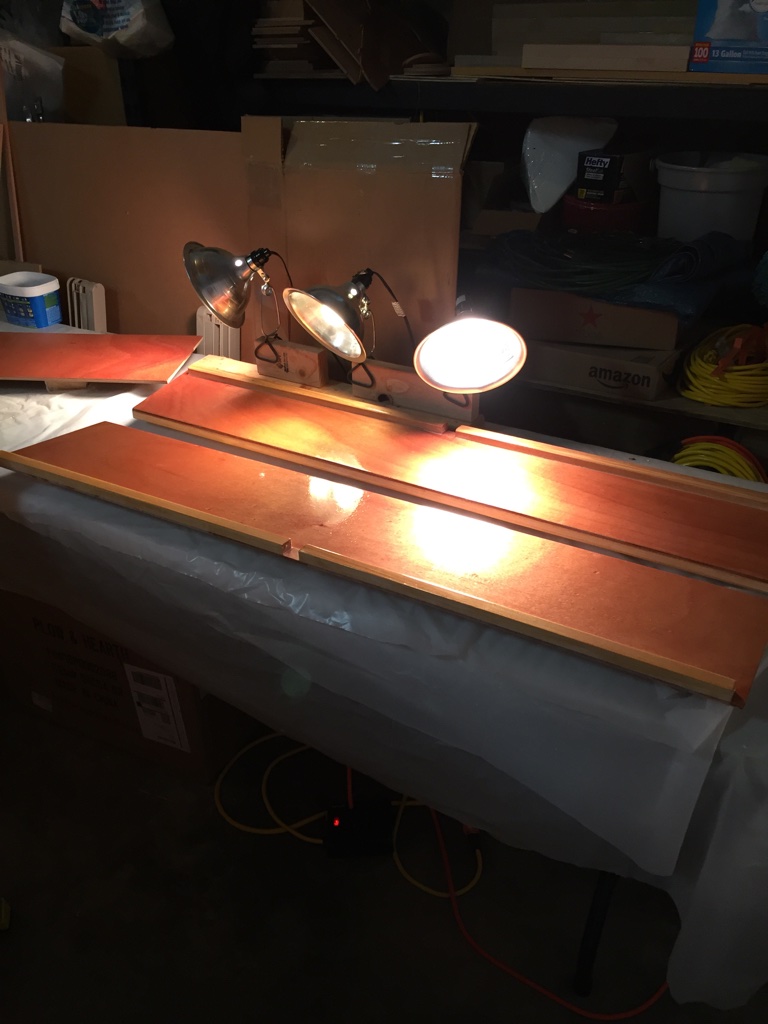
The manual is right that the finishing of the floor boards is a project in it's self. Below are pictures of the boards drying after multiple sessions. I used some 2X4s covered in plastic. They work pretty good especially when working with epoxy. If you are not careful, you can easily epoxy 2 pieces of wood together. I would coat one side per night and then come back and do the other side until I had 2 coats on each.


Below are the 2 outer most pieces. If you recall, this is where I epoxied two smaller pieces together to make a large one. The outer most piece didn't have any floor supports to screw down to. Since I purchased the timber package, I had two smaller pieces that I epoxied together. You can see the screws on the out edge that I used to hold them together.


I have one more coat to put on these smaller pieces below then I will be able to screw them all down. 
I also need to figure out my electrical path. In the stern, there are no holes drilled yet on the boards and I need to figure out the path for a stern running light and some convenience receptacles.  Not sure if I am coming under the floors or overhead through the seat backs.


Sunday, March 26, 2017

2nd Interior Coat, Danish Oil on Floor Boards and Assorted tasks


Last week after work, I was able to do a couple of different assorted tasks. I added the other sheave on the center board. I have both holes filled with thickened epoxy and will need to drill out.


On the centerboard, there is an inspection port that needs to be installed on both sides. This allows for access to push down the centerboard if necessary.  The top part of the inspection port will hit the top cleat, so you need to cut it to fit. Below is where I was cutting one side. I taped up the inspection port, so I would not scratch it. I used my bandsaw to cut it and it worked fine.


Inspection port cut so it will fit. 


I also decided to add an extra coat of epoxy on the cockpit sides on the interior sides. I am not sure if I am going to paint these or just leave them with a clear coat of epoxy. You won't be able to see and they may look better with some natural wood showing.

I did a quick sanding before applying the clear epoxy. 

Here they are drying overnight. It was still cold last week at night, so I used work lights to help them cure. 

This is the bottom of the cockpit. I put one coat on last week and will need to add a couple more. 


It finally warmed up enough to put a second coat on the interior. I may touch up a couple places, but I think I am good. It turned out very nice. I painted it in the garage last Friday night and then rolled the boat outside so it could dry. I covered the whole thing with a large tarp, but they were not calling for any rain and the temperature was in the mid 50's.


Waiting for the weather to get better, I finished sanding all the floor boards earlier in the week. I applied a coat of Danish Oil on some of the pieces today and will be doing the other side some day this week. I will then do the process again to get multiple coats applied. I used one of the cheap chip brushes and it seemed to work good. I just poured some danish oil in a cup and dipped and applied with long strokes.  Below are pictures of the longer pieces drying. I will do the shorted pieces after I get multiple coats on these pieces, since I am limited on work space.


The boards have a nice honey color and will look nice once I install them later. 


Thursday, March 16, 2017

Centerboard Sheave and Pendant!

Well I do wish it would hurry up and get warmer. It is definitely slowing me down. I am waiting for it to be warmer enough to finish painting the interior and to apply danish oil to the floor boards.

I am doing as much work as possible with the cold temperatures. I finished up a few more of the floor boards making them ready for Danish Oil. I still have all the long boards to sand.


I added a few more coats to the battery tray, cable conduit cover and what I am thinking about using as an Electrical Panel. Still trying to come up with a plan.  I am also deciding whether or not I want to paint them. I like the natural look, but my epoxy coatings were not my best work. I used a brush, since a roller was too large to get into all areas.


I started to work on the Centerboard Sheave and Pendant! Below it shows where I measured and drilled a larger hole and have since filled with epoxy. I used 5/8ths and the actual hole for the bolt will be 3/8th inch.  It is a little unnerving to drill into things! :) 


Below is the first versions of the sheaves. I cut them out and then decided to look at the plans. The plans shows them more in a U shape and I had them more of a square. I had already applied a coat of epoxy to them, but then cut them to more of a U shape and added another coat. A bandsaw works good for this. 

1st version of sheave

Final version of sheave
Last night I epoxied one sheave and filled the whole with epoxy. It is curing now. I will then do the other side side and let that cure. After a few days I will drill the correct size to fit the bolt and install the sheave. 


For the center board pendant, there is somewhat of an error in the manual. Or maybe a better way to say it a possible step left out.  So below is my interpretation  and  what I did. The actual pendant is 5/8 inch in diameter.

Note: I probably should say that I ordered the hardware kit from CLCBoats, so if you are purchasing your hardware separately, this may not work. I would also confirm sizes of the hardware you get before doing any drilling.


  1. Drill 5/8 inch hole all the way through. 
  2. Drill 3/4 inch hole 1/2 inch deep.  ( This will leave room to drill a 5/8 hole for the pendant. 
  3. Fill with epoxy. 
  4. Drill 3/8 inch hole in the epoxy all the way through. 
  5. Drill 5/8 inch hole 1/2 inch deep in the epoxy. 
This will give me filled epoxy around all components. 


Below is where I had drilled the first 2 holes above. I then filled with epoxy last night and it is curing. I used the pastry bag method so I could squirt epoxy up into it. Worked pretty good.

If you zoom in on the hole, you can see the larger 3/4 diameter for the first 1/2 inch deep. Then it goes to 5/8 inch. 

I put tape over the whole to hole the epoxy in. I went thick, but I should have gone thicker.   Once this cures, I will drill the 3/8 inch hole all the way through and then a 5/8 inch hole 1/2 inch deep to fit the pendant into. 

So I am trying to make good use of my time and the above items I wanted to take my time. I think I spent a good 5-6 hours measuring, remeasuring and measuring some more before drilling. Most of this was in the evenings after work.


Monday, March 6, 2017

Waiting for Spring and odd Tasks!

Well so much for the 60 degree weather this past weekend that they were calling for earlier in the week. It barely made it into the 40's, so conditions for painting were not there. I have to be able to ventilate the garage to be able to paint.

So with the weather not cooperating, I did work on the boat for 4-5 hours on Saturday. Had to do other things around the house on Sunday.  I started off by doing some sanding with 320 grit on the interior paint 1st coat.  I probably should not have used my orbital sander, because I went through some of the paint in areas. Not a big deal, I can easily cover that up with the next coat and they were probably high places that needed to be sanded down anyway. I will probably get some 320 sheets to use by hand instead of using the orbital sander.

Once I completed that I decided to work on sanding the floor boards and working on the battery box tray. I applied some fiber glass to the bottom of the battery tray and got two coats on it Saturday and Sunday. I will get another coat on tonight or tomorrow.

Battery tray and cable conduit cover drying with epoxy applied.
The majority of the time Saturday I spent sanding some of the floor boards. Most of them I used 220 grit, but on the outer most boards from the center, I used 120 and then 220. Remember I epoxied 2 pieces of wood together to make 1 wider piece, since there is really no where to screw them down.


The 2 pieces on the left are the ones I epoxied 2 pieces together. 

They turned out very good. Nice and smooth! As soon as the weather gets warmer, I will apply the danish oil I purchased.  

It would be so nice if I had a nice heated workshop, but I will have to deal with what I have. This coming up weekend is not looking much better for the bigger jobs of painting and applying danish oil. They are calling for snow, but I will keep my fingers crossed. 

If the weather does not cooperate, I have plenty of other small jobs I can do and I might start on the rudder. There are no fumes with using the epoxy and I can use the work lights to keep things warm enough to cure. 


Wednesday, March 1, 2017

Some work on battery platform and Went on a trip!

Didn't have a chance to work on the boat this past weekend. We took a trip out of town to a Bed and Breakfast and took my parents. Had a very enjoyable time. I did manage to do a few small tasks after work on a couple days.

Working on the Battery Platform:
  • I cut some cleats and did a round over on the edges on the router table.  The cleats will be used to hold the battery box on the platform I built.
  • I then cut them into small lengths using the bandsaw. 
  • I epoxied them and they are curing under a light. 
  • Once they cure, I plan to fiberglass the opposite side to provide some additional strength. 


Above I am laying out the parts to make sure the battery box fits. The places where I cut the notches in the middle of the board will allow the strap that came with the box to go around the wood and hold the box in place. The pieces of wood will hold it from slipping off. The top part of the picture will go against bulkhead #2. The added space will allow the power cables to come out of the box and go up the conduit box I built to the back of the electrical panel. I am still looking at the electrical panels and 12 volt outlets online and will be ordering the parts soon. 


You can see the round-over on the top that I did on the router table. Just for looks.

Glued up with epoxy and curing under the light. 


This coming up weekend is supposed to be nice. Not sure if I can paint Saturday. The high is only calling for 50 degrees. Sunday is supposed to be in the 60's, so I should be able to apply the 2nd interior coat.  I ordered some 320 grit paper to sand the 1st coat. Hopefully it will be here by Saturday. If not, I will finish sanding on the floor boards and put a coat of Danish Oil on. 
I have plenty of options to keep me busy!! 


Monday, February 20, 2017

1st Interior topcoat

Saturday was high in the low 70's, so I decided to paint the 1st top coat in the interior. I am using Interlux Brightside. Due to the fumes, I pulled the boat outside and painted there.

Before I started, I needed to sand the primer in the bow area between 1&2 bulkheads. I also touched up a few spots earlier in the week with thickened epoxy. Some places I sanded too much! I sanded those areas down and then wiped everything down.

Another reason I pulled the boat outside is the wife complaining about the fumes. The Interlux Brightside is definitely strong smelling. I also bought a new full face respirator from Jamestown Distributors. I think it works better with a beard and also has the eye protection. I was using the standard one that CLC Boats sells.

Below is my setup. I used a portable shelter to shield me from the Sun. It was getting a little toasty! I also had some fans running behind me blowing the air out of the garage.


I spent about 4-5 hours pre-sanding, wiping things down and then painting. After I finished, I decided I was going to leave the boat outside to dry and it was better with the smell. They were not calling for any rain (10% chance), but I decided to put a tarp over just in case. It did sprinkle some, but no damage done.


Below are some pictures of the finished work. I still have another coating or two to put on, but I like the way it is turning out. The shine is nice! As info, I have used the following so far.

1 - Quart Interlux Pre-Kote
1 - Quart Interlux Brightside. ( I still have a little left)

I am estimating about another quart or 2 to get a nice finish.


This is only the 2nd time I have pulled the boat out into the driveway. I am very glad that I put the building frame on dollies.  Below is a good shot of the 4 dollies I am using.  This will allow me to push the boat outside to paint.


Yesterday I had to do some other things, but I did go to Home Depot and bought some insulation. I will be posting some pictures of that as I cut it out for the bow area and the area in the the stern.

Monday, February 13, 2017

Started Priming the Interior!

Well I finally started to paint the interior. It seems like for ever that I have been sanding on fillets and fiberglass. This is a big milestone for me! I had a rough week this last week at work, so I was able to take a day off on Friday. I took the opportunity to start priming the interior and chilling out working in the garage on the boat all day.

I have sanded, done a little sanding and then sanded some more, but I think it definitely paid off. In applying the primer, I think the final finish is going to look great! Any issues I thought I had will be covered with the high build primer. But actually all the sanding, I don't really think I even needed the high-build primer.  Again, I chose to use Interlux Pre Kote. The manual calls for oil-based house paint, but I really didn't see anything I wanted to use as the big box stores. I also thought it would be good to do some practice with what I plan on painting the exterior with.

If you have been following my blog, you know I have been sanding a lot and it has been a few months. I vacuumed the interior again and then took a rag with some denatured alcohol. I read this on the hints section on the CLC Website. I had previously gone over the entire interior with my hand and sanding pad, but as I wiped over the sections, I found some little bits of epoxy that my rag caught on. I found it weird that I had not discovered them. I think my point is that using a rag will definitely find any little blobs that you may have forgotten. I just took a small piece of sanding paper and rubbed them right off and wiped any dust away.

Another thing I found with the Interlux Pre Kote is the smell. You definitely need to be in a well ventilated area when using this, so keep that in mind. Since the weather was barely above 50 degrees, which is the minimum, I had to run a little heater while I had the window fan going to move some air. Normally I would not have worried about it, but I have a cat that lives in the garage and I don't want to cause her any harm. Long story about the cat, but she is there and I need to be cautious. I did use a respirator. Maybe they have one for cats.

I found the Pre Kote went on very easy. I used a small roller and brush to apply and they were disposable, so I didn't have to worry about much cleanup. I first poured some of the paint into a mixing cup and stirred with and then put it into a small paint pan I purchased.

I applied the Pre Kote on 2 different days.


  • Friday was the main interior and it was low 50's in the garage. I just mixed the Pre Kote and then poured it into the roller pan. I did notice some roller marks after it dried.


  • Sunday I finished up the storage section between bulkheads 1& 2. This time I did the same, but added a 1/2 cap full of Interlux 333 to the paint. It seemed to roll on easier without any marks. There was also a noticeable difference in temperature. It was in the upper 70's.


Moving ahead I think I am going to have to wait to paint on warmer days to get a good finish. Next weekend is calling for 60's and 70's. I also think I will add some of the Interlux 333 to thin the Pre Kote as well. I think this is the reason I didn't see any roller marks.

On Sunday it was so nice, I rolled the boat outside to sand the primer. I used 220 grit on my orbital sander and went over the entire interior. All I need to do now is wipe down again and start with the finish coats. This is the first time I have really used the dolly wheels I had built. I am still on the fence as to whether or not they were worth it to build??

Below are pictures of the prime coat applied.


After the prime coat dried, I sanded the interior with 220 grit with my orbital sander.


On Sunday I applied the Interlux Pre Kote in the bow section between bulkheads 1 and 2.


Different view of the bow section looking through the access holes.


This is the type of roller I am using to apply the Pre Kote Primer.