I have been meaning to post this video of pictures I took of the original PocketShip at the Winter Open House CLCBoats had last December. I tried to focus on the details of the boat. If you look at the pictures in detail, you will notice the location of drain holes and how / where things are installed. You will also notice the location of the sailing hardware. I will definitely be using this as a reference as I build the boat, especially as I start to install the hardware package and sailing hardware. I hope it useful to others.
https://youtu.be/bUOax6-QiNU
Since I took the video, the original PocketShip has gone through a new paint job and it is looking better than ever! This is also a reminder that after we build the boat, we will have to maintain her over the years.
Saturday, July 30, 2016
Thursday, July 28, 2016
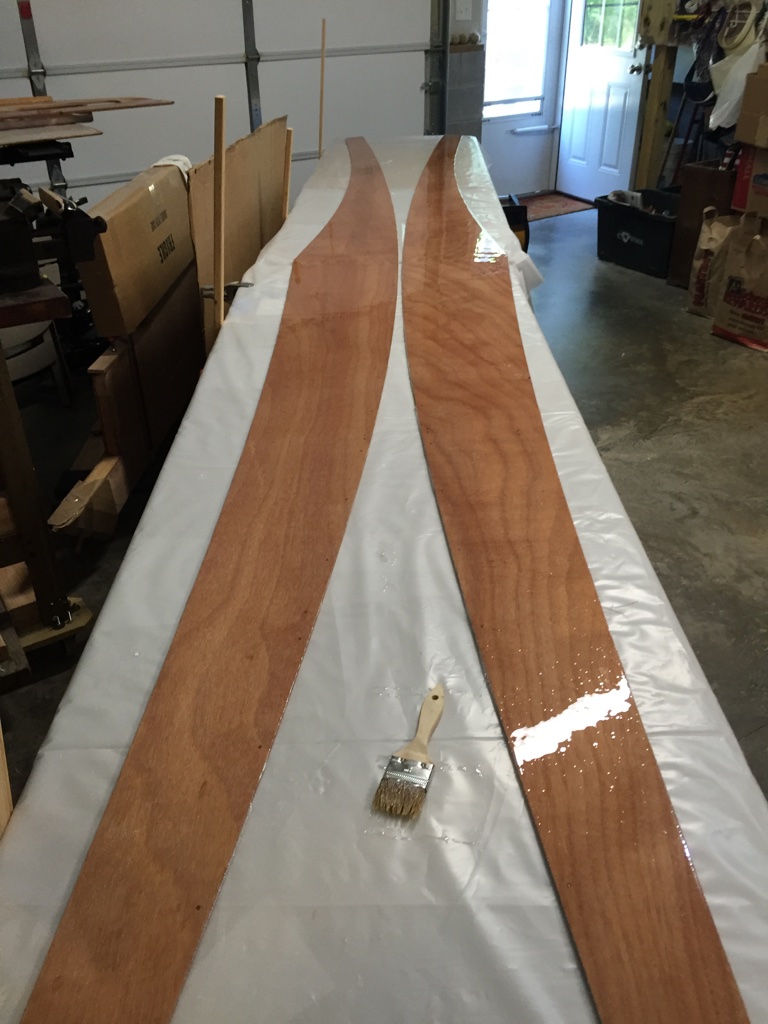
Bottom Panels and Bow Stitching
Bottom Panels
I spent the last two nights stitching and restitching the two bottom panels to the keel. It took me a little while, since I had to lay down to tighten the cables. I broke a few, but would just get another one. When I say restitching, I did remove a lot of the copper cables and replaced them with steel, because I kept breaking them and could not get them tight enough.


The above pictures show the bottom panels stitched in and bulkhead #4 stitched in as well. The holes did not line up with the cradle for bulkhead #4, so I just drilled a couple new holes so I could stitch everything to the cradle. I spent a lot of time trying to line everything up and make things look good. I have a level you can see in the picture and I also measured from the bow to each end of the stern and it was right on. I like it when a plan comes together.
The Bow
The bow was interesting. The bottom panels kept slipping over each other when I tightened things up, so I removed the cables and took my plane and took off the edge about 15 inches on each side. This gave them more of a square edge where they connected. Seemed to do the trick.
It also took a while to pull things together. I did some last night and left about 2-3 inches from bringing it all the way. Tonight I finished pulling it all together. I also added another set of holes in the bow area to help leverage getting it together.
Below are some pictures of the bow.
 |
| Last night almost together. |

 |
| All stitched together. |
Tuesday, July 26, 2016
Cradle Assembly
The heat advisories continue in Virginia. For the last 4 days, we have had head advisories with heat index of 105-110 degrees, so it has not been very enjoyable working in the garage. I still wanted to work on the boat, so I suffered for a while, but had some big results. I put the cradle assembly together and put it on 4 furniture dollies. This will help me to move the boat around the garage to work on. Each of the dollies supports 800 lbs, so they are more than enough. I assembled everything with 3" screws and it is sitting very level, but I will probably shim it up or block the hold thing up when I start doing the epoxy fillets. The dollies raise the cradle about 5-6 inches. I don't think this will be a issue. I have a portable work bench that I can use to help me reaching into the boat. I will post a picture of that.
 Here is the completed cradle with the keel assembly. I probably should have had someone help me lift it in there, but I was able to move it into position, since it was sitting on 2 dollies. I would recommend getting some help. I had to lift and install it a couple of times until I got it where I think it should be.
 Here is a closeup of the cradle. I used a 2X8 and a 2X6 I had in my shed and screwed them to both the cradle and dollies.
 Another view of the cradle.
Once I got the cradle all put together, I could not resist putting in one of the bottom panels. I had to drill out some of the cable holes and had to cut the copper cable I purchased from CLCBoats. While trying to tighten the cables, I broke two. I had some 17 gauge electric fence cable, so I cut a couple pieces of that. I think I will be using more of that, since I have already broken 2 pieces of the copper.
The pictures below is the starboard bottom panel stitched in. I will need to go back and tighten everything, but I wanted to see it in the cradles. I also wanted to have something protecting the front of the keelson. I can see me walking into it and breaking it! :-)


I had to take down both of my plastic tables that I had been using to work on. I did a rush job, since it was hot, but I will need to do some reorganizing of the garage to make working around the boat easier. I will try to do that over the next week.
 Here is the completed cradle with the keel assembly. I probably should have had someone help me lift it in there, but I was able to move it into position, since it was sitting on 2 dollies. I would recommend getting some help. I had to lift and install it a couple of times until I got it where I think it should be.

Once I got the cradle all put together, I could not resist putting in one of the bottom panels. I had to drill out some of the cable holes and had to cut the copper cable I purchased from CLCBoats. While trying to tighten the cables, I broke two. I had some 17 gauge electric fence cable, so I cut a couple pieces of that. I think I will be using more of that, since I have already broken 2 pieces of the copper.
The pictures below is the starboard bottom panel stitched in. I will need to go back and tighten everything, but I wanted to see it in the cradles. I also wanted to have something protecting the front of the keelson. I can see me walking into it and breaking it! :-)


I had to take down both of my plastic tables that I had been using to work on. I did a rush job, since it was hot, but I will need to do some reorganizing of the garage to make working around the boat easier. I will try to do that over the next week.
Sunday, July 24, 2016
Glued Keelson to Keel Assembly
Today I glued the keelson to the keel assembly. I did a combination of drywall screws and clamps to hold it in place. I will remove the drywall screws once everything is cured. I think everything turned out good. Today was the first time I used a pastry bag. It worked pretty good. I need to thicken the epoxy a little more next time and I might use a small piece of wood to hold the epoxy from coming back the other way when I squeeze it. But for the first time using the pastry bag, it was actually pretty easy. I purchased them on Amazon, but I see now that CLCBoats is also starting to sell them.


 |
| Keelson and Keel all glued up. |
 |
| Bow section of assembly. |
In the above pictures you can see the keelson glued to the keel. I used a rag on the front of the keelson to hold it down, but it was not enough weight, so I used a welding glove, which was a little heavier.
Moving Keel Around
Before today, I needed a way to move the keel assembly around and also to protect it. For right many weeks, I have had it sitting on 2 furniture dollies. You can also see the cardboard cap I taped up to protect the nose block from me moving it around and possibly running into something. I also purchased 2 more dollies today and plan on using them to put the cradle on.


Saturday, July 23, 2016
Sanding Side Panels and Building Cradle
I got a lot completed yesterday and this morning before the heat got to me. We have had heat indexes over 100 degrees, so it was pretty warm in the garage. I got side panel #2 glued yesterday and I sanded both this morning. What a job!!! They turned out ok, but I would have like to have them better.
Looking back at the puzzle joints, I would have done them a little differently. One thing I would do is use something different than the plastic folding tables. They work good for sanding and coating, but when you need a lot of pressure to force the puzzle joints together, I think you need a sturdy/solid surface. Maybe do them on the cement floor.
One thing I did on this last side panels is to use blue painters tape and tape around the joint. This helped to control the cleanup. Wish I would have thought of this before the last one! :-) I forgot to take a picture of the tape applied, but you can get the idea with the picture below. I used 2 pieces on both sides. You can't leave them on or they will be glued to the panels. I removed them before applying the solid board and weights.
I am getting close to putting everything together, so I decided to work on the cradles. I did have a question on the length of board between the cradles, so I am going to post something on the PocketShip.net forum.
Looking back at the puzzle joints, I would have done them a little differently. One thing I would do is use something different than the plastic folding tables. They work good for sanding and coating, but when you need a lot of pressure to force the puzzle joints together, I think you need a sturdy/solid surface. Maybe do them on the cement floor.
One thing I did on this last side panels is to use blue painters tape and tape around the joint. This helped to control the cleanup. Wish I would have thought of this before the last one! :-) I forgot to take a picture of the tape applied, but you can get the idea with the picture below. I used 2 pieces on both sides. You can't leave them on or they will be glued to the panels. I removed them before applying the solid board and weights.
 |
| Puzzle Joint with blue painters tape. |
Another tool I would recommend and I may have already is the cabinet scrapers. They work good to clean up the excess epoxy.
 |
| Cabinet Scraper to clean up epoxy. |
I am also thinking about how to put wheels on the cradles, so I can move the boat around in the garage. I will come up with something.

Below is the 2 cradles I have attached.

Wednesday, July 20, 2016
Bottom Panel Puzzle Joint and More Sanding
I finished up sanding bulkhead #2 and #7 tonight. I am still having a hard time with sanding wood just coated with epoxy. You have to be very careful not to go to bare wood. I think everything will be ok, since most of the spots will be covered with large fillets or cleats that will be added at a later date.
I have been thinking about getting a detailed sander and I think I will pull the trigger soon.
Below are bulkhead #2 and #7 cleaned up. I brought them inside to store them until I am ready to put them together.
After I finished up the sanding, I started to work on the bottom panels. I sanded off the individual puzzle fingers and dry fitted them a few times. The puzzle joints are definitely tight to get together, which is what I think the should be. You just have to play with it a little to get it to go together. Once I got it to fit, I mixed up some thickened epoxy with cabosil. I have it weighted and clamped down.
I have been thinking about getting a detailed sander and I think I will pull the trigger soon.
Below are bulkhead #2 and #7 cleaned up. I brought them inside to store them until I am ready to put them together.
 |
| Bulkhead #2 |
 |
| Bulkhead #7 |
After I finished up the sanding, I started to work on the bottom panels. I sanded off the individual puzzle fingers and dry fitted them a few times. The puzzle joints are definitely tight to get together, which is what I think the should be. You just have to play with it a little to get it to go together. Once I got it to fit, I mixed up some thickened epoxy with cabosil. I have it weighted and clamped down.
 |
| Bottom Panel #1 |
Tuesday, July 19, 2016
3rd Coat Topside Panels and More Sanding
I am trying to plan multiple tasks in a evening, so I can take advantage of the space and the temperatures that I am working in. I lucked out this afternoon with a thunderstorm that came through. It dropped the temperature about 15 degrees, which made the garage much more comfortable to do any work in. It was nice not dripping all over my work! :-)
Tonight I sanded Side Panel # 2, so I am good to go with them. I am learning that sanding less is more or better. Basically the procedure I am doing is as follows.
1) Using the orbital sander with 120 grit, I go over the entire piece once.
2) I then use a sanding block with 120 grit and again go over the entire piece.
3) Using the orbital sander with 120 grit, I go over the entire piece again. This picks up the dust from step #2 as well as defines the finish more. Any spots during this step, I will take the sanding block and fix them.
There is probably a lot of ways to sand, but this is working for me. I think using the hand sanding is more work, but I definitely have more control.
 |
| This is after Step #2 hand sander. |
 |
| The top part is final. The bottom part is after Step #1 |
3rd Coat on Side Panel.
I am using this blog to share my experience, but I am also using it to help me remember where I am at in specific tasks. It was a couple days ago that I put the 2nd Coat on the Topside panels. MAS Epoxy states "If more than 12 hours passes between coats, do a light scuff sand."
So following the recommendation, I did a light scuff sand on both of the topside panels. I then cleaned up both panels before putting on the 3rd coat.

Next up: glueing the bottom panel puzzle joints and doing some cleanup sanding on the keel and couple bulkheads. I still need to work on the centerboard, but I am not rushing that.
Monday, July 18, 2016
Cleat Locations - Pictures of Original PocketShip
Posting some pictures in a response to PocketShip.net question:
At last years Winter Open House at CLCBoats, I took a lot of pictures of the original PocketShip. I focused on the locations of some of the different hardware. Below are pictures of the 6 Cleats and the locations on the boat.
 |
| Centerboard Cleat |
 |
| Boom Gallow Cleats |
 |
| Tabernacle Area 3 - Cleats |
 |
| Tabernacle Area |
| Boom Gallow Cleats |
Sunday, July 17, 2016
Sanding, Epoxy and Bulkhead #7
I got a lot done this morning before it gets too hot. To start, I decided to do some sanding on Bulkhead #2 and Bulkhead #7. I have been waiting for them to cure completely before I could do any work on them. For Bulkhead #7, there was no electrical hole, so I drilled that and put some more additional epoxy on the piece.

Side Panel Sanding
Since space is limited to work on the long side panels, I decided to sand one of the side panels before using the table to put another coat on the Topside Panels. Below is a picture of the finished product.
I used my orbital sander with 120 grit sandpaper and a hand sanding block with 120 to work on any specific areas. I think it turned out great. I have a spray bottle with just water that I will mist pieces and wipe the dust off.

Topside Panel Epoxying
After I finished the Side Panel, I then wiped off the topside panels and then applied the 2nd coat of epoxy. I have the 3rd coat that I will probably do tomorrow evening after work. Below are the panels all wetted out.


 |
| Bulkhead #7 with new electrical hole. |
Side Panel Sanding
Since space is limited to work on the long side panels, I decided to sand one of the side panels before using the table to put another coat on the Topside Panels. Below is a picture of the finished product.
I used my orbital sander with 120 grit sandpaper and a hand sanding block with 120 to work on any specific areas. I think it turned out great. I have a spray bottle with just water that I will mist pieces and wipe the dust off.

Topside Panel Epoxying
After I finished the Side Panel, I then wiped off the topside panels and then applied the 2nd coat of epoxy. I have the 3rd coat that I will probably do tomorrow evening after work. Below are the panels all wetted out.
Saturday, July 16, 2016
Smoking! and Centerboard Shaping
 |
| Epoxy left in Cup Smoking!!! |
 |
| Glass laid out and ready for epoxy. |
 |
| After Coat of Epoxy Centerboard Shaping
The epoxy on the center board has cured, so I started to shape the centerboard. I first start with my belt sander and sanded down the are of the lead pour where I poured thickened epoxy with cabosil. This mixture of epoxy and cabosil is like concrete. It goes through sandpaper like tissues and water. You do need to be careful when using a belt sander. It is meant to be used to take away larges portions quickly. I thought about buying a grinder, but I am glad I used the tools I had.I used the belt sander to sand down the cabosil mixture on the lead pours. I then used my block plan, which i sharpened before use. I took was a good tool do take away the large portion of wood to shape the centerboard. I got it close today, but I have some more work to do. I want to make sure I get the shape right. I feel that the best way for me is to use hand tools like the plane and sanding blocks. I did us my orbital sander, since I am comfortable with it and it can not take off a lot of wood quickly You can, but I feel like I have control. I still have a lot of work to do on the centerboard, but I got the major work done today.

Above picture of centerboard shaping major areas removed.

Edge of centerboard. I need to get a bullet shape!
|
Wednesday, July 13, 2016
Glueing Topside Panel Puzzle Joints
I finished up side panel #2 today by cutting off the excess fiberglass and taking a plane to the edges so I will not cut myself. I have it set aside so it can cure for a few days. With the weather and temperatures we are having it should be fully cured in about 3-4 days. I will be sanding both side panels this weekend.
I glued up both topside panels this evening with thickened epoxy and cabosil. But before mixing up the glue I took time to sand the puzzle fingers a little and dry fit it a couple times to make sure it would go together fine. Everything looked to turn out fine. Below is a picture.

I have been making good progress this week. Getting things done despite the heat. Looks like no relief, so I will just continue to do one task at a time.
Tuesday, July 12, 2016
3rd coat on side panel #2 and starting to shape centerboard
I put the 3rd coat on SidePanel #2 tonight after work. I will let it cure for a few days before starting to sand. Side Panel #1 should be fully cured by Thursday, so I can start sanding it then. It should be fine to move tomorrow to free up space on the 2 - 8' folding tables I am using as work benches. Below is the finished product.

I do wish I had a bigger garage to build PocketShip in, but it will have to do. I probably could get more accomplished quicker, but work table space is at a premium. I can only work on one long piece at a time. Next up will be to glue the 2 Topside Panel puzzle joints. Since they are not as wide, I can do them both at the same time then fiberglass at the same time as well.
Centerboard Shaping
I started to work on shaping the centerboard. I was thinking about buying a hand grinder, but I am not sure I will need it. I started to shape the edges using a block plane and a rasp I got from CLC. I didn't get too far, because of the heat and I didn't want to get saw dust all over the newly epoxied Side Panel #2. I couldn't move outside, since they are calling for thunderstorms, so I just called it the evening.
The plane and rasp look like they will do the job and I have a lot more control over hand tools rather than power tools. I have a spent a lot of time on the centerboard and don't want to mess it up, so I may continue with hand tools to shape it. It may take more time like I said, but I think it is a safer route. You can see the pile of shavings on the floor and that took about 10 minutes in the picture below. The rasp is also good for getting globes of dried epoxy off. I would definitely recommend one in your tool bag.

Sunday, July 10, 2016
Continue Fiberglassing the Side Panels and working on Centerboard
I finished up Side Panel #1 today. Yesterday I put the final coat of epoxy on it and this morning I cut the extra fiberglass off the edges and used a plane to even up the edges and planed off the glass, so I won't cut myself.
In preparation for fiberglassing Side Panel #2 today, I brought the fiberglass roll into my office and rolled it out on the floor to length. I then cut it in about half. One half will be used for Side Panel #2 and the other half for Topside panels.


The picture above is the end result. 2 for the Topside Panels and 1 for the Side Panel #2.
This morning I started to fiberglass Side Panel #2. For some reason it seemed like I used a lot more epoxy. I didn't overcoat. I used enough to wet it out and barely fill the weave. It must be me thinking too much!

Bulkhead #7
Since I forgot to glue the cleat on Bulkhead #7, I did that yesterday. I used clamps where I could and then free weights where the clamps would not work.

Since I am doing multiple different projects and you have to wait until the epoxy cures to go to the next step, I have started to use some index cards and office clips. When I do a coat of epoxy, I will write the date and clip it to the piece. That way I don't have to guess when I did something. I also use a notebook and note the different coats of epoxy. When I do coat's, 1,2 and 3 for each part.

Centerboard
After I poured the lead on the centerboard, there was a slight void on one side where I did not fill all the way level. On the other side, there were bubbles that needed to be filled. Both sides will be sanded level in preparation for fiberglassing. For both sides I used thickened epoxy with cabosil.
Below are pictures of both sides. Once they have cured I will begin shaping the centerboard and then fiberglass. Notice the level and door shims I used to level my portable work bench. I have found that the door shims come in handy for a lot of different things. Be sure to level your workspace or you will have epoxy running all over.


In preparation for fiberglassing Side Panel #2 today, I brought the fiberglass roll into my office and rolled it out on the floor to length. I then cut it in about half. One half will be used for Side Panel #2 and the other half for Topside panels.

Fiberglass rolled out and cut.

The picture above is the end result. 2 for the Topside Panels and 1 for the Side Panel #2.
This morning I started to fiberglass Side Panel #2. For some reason it seemed like I used a lot more epoxy. I didn't overcoat. I used enough to wet it out and barely fill the weave. It must be me thinking too much!

Bulkhead #7
Since I forgot to glue the cleat on Bulkhead #7, I did that yesterday. I used clamps where I could and then free weights where the clamps would not work.

Since I am doing multiple different projects and you have to wait until the epoxy cures to go to the next step, I have started to use some index cards and office clips. When I do a coat of epoxy, I will write the date and clip it to the piece. That way I don't have to guess when I did something. I also use a notebook and note the different coats of epoxy. When I do coat's, 1,2 and 3 for each part.

Centerboard
After I poured the lead on the centerboard, there was a slight void on one side where I did not fill all the way level. On the other side, there were bubbles that needed to be filled. Both sides will be sanded level in preparation for fiberglassing. For both sides I used thickened epoxy with cabosil.
Below are pictures of both sides. Once they have cured I will begin shaping the centerboard and then fiberglass. Notice the level and door shims I used to level my portable work bench. I have found that the door shims come in handy for a lot of different things. Be sure to level your workspace or you will have epoxy running all over.


Friday, July 8, 2016
Centerboard Trailing Edge and Where is my electrical hole?
It is very, very hot in Virginia this week, so I could only take about 2 hours in the garage after work. I was able to get a couple things done. I added another coat of epoxy to the side panel to fill in the weave and will do a 3rd coat tomorrow.

I also mixed up some thickened epoxy and poured it in the rabbet on the trailing edge of the centerboard. Next up will be to fill the voids on the lead pour and then I can start shaping the centerboard.

Lastly I forgot to put the stringer on Bulkhead #7, so I cut that and started to do a little sanding on it, since I have already put two coats of epoxy. I will glue that down tomorrow. While working on the piece I noticed that it does not have the hole drilled for electric work. Where did my hole go? It shows one in the plans and I have seen it on the web pictures. Not a big deal, but I will need to drill that out, since I do plan on putting some electrical in my boat. I will also let CLC Boats know, since there may be a problem with the CNC Machine code.
 |
| Where is my electrical Hole? |
Subscribe to:
Posts (Atom)